As you may have noticed if you came here from the main site the main site just completely changed. Instead of many sub-pages, most of them relatively unused, the site is now one giant infinite-canvas crawl with links to the various simulators and educational games I make. This will display better on mobile devices, but it also signals the removal of a giant barricade to keeping the site updated: Django.
I don’t want to bash Django here. It’s a great framework. When I started this site I was using database-heavy applications, things that let me pull out my phone and drop data into a database on my own site. Django is great for that. These days I’m using exactly none of these, and the site is just a giant link farm to a bunch of javascript programs. The problem with this is that Django has a (really incredible) extensible template model that uses a {%static %} tag to allow the server to fill in the location of the static files on a server. Note that javascript programs are just piles of static files from Django’s viewpoint. And so every time I move from my development branch of a program to loading it on to the site I need to change every single resource link to include this {% static %} tag. Something like “images/shark.png” has to become “{% static ‘basesite/shark.png’ %}”. The upshot? I don’t keep the site updated very well. It’s just too much of a pain.
However, there’s a simple framework for serving up a giant link farm with images: the plain old HTML file. So that’s what the site is now. (I mean, there’s a CSS stylesheet, too. I’m not a beast.)
More importantly, this has also motivated me to update the site. The most important update is Beta Testing. It’s got a nice logo, because who doesn’t like a fish pun?
Image created by Eric Butler. CC-BY-4.0.
I’m always working on something (or several somethings) and some of these things are usable, if undocumented and slightly kludgy. But if you’ve used open source projects before that will be familiar, anyway1. Now these are available for you to play with under a clearly-labeled section!
Right now two projects inhabit this space (this will change, since projects eventually move on to…um…gamma testing? production?): OPE Survivor and the Circulation Model. I suspect most people can work the circulation model without help, but OPE Survivor may be harder. Essentially (I’m NOT documenting it fully here!) you can edit either the environment or the species (by changing how it allocates energy across growth) to help your species survive. The amount of energy to spend on an offspring and how much to spend on reproduction versus growth at different sizes are the key parameters to change, and ones that should be familiar to anyone who’s taken ecology classes. Figuring out the size-based energy allocation (and the secret rules, where small animals can’t store as much energy) is the most difficult part.
VectorGrid is, fundamentally, a puzzle game. There are three targets on the screen which need to be hit by a projectile from each of three launchers, but aiming the projectiles can only be done by steering them using rows of pushers applied to entire rows and columns.
VectorGrid also has several levels of complexity. I recommend that you start playing VectorGrid in single-player mode without either advanced options or the mover enabled. Once you feel good about the basic game, switch on the advanced options. When this gets predictable, enable the mover.
Quick Start
You’re playing single-player, no fancy options. You just want to start. What do you do?
The board will look like this:
On the left is the playing grid. Three targets (dark circles) are present, and three launchers (red, green, and blue) in the corners. In this diagram, a row of pushers is located in row 5, pointing up at about 45 degrees.
On the right is the control panel. For a quick start we want to focus on the top section of the control panel, shown below.
On the right is the launcher control section. Currently, the red launcher (top left) is selected. Clicking “Shoot” will shoot a projectile from this launcher. I strongly recommend beginning any single-player game by shooting a shot from every projectile to see where it goes.
On the left is the pusher control panel. Currently, we are ready to add a column of pushers aimed to the right (0 degrees, degrees are added counter-clockwise, and negative degrees are accepted as valid input) at full strength (100) in column A. Pushers can ONLY be added to an entire row or column, which is where the puzzle nature of the game comes into play, because fixing the projectile path for one launcher may interfere with another.
Without any interference, all the launchers will simply fire straight through the middle of the board. To hit targets that are not in the initial line of fire you will need to add pushers to deflect the projectiles. A pusher pushes anything in its entire square, not just on its arrow icon, and continues to push as long as the projectile is in the square.
The goal is to hit every target with a shot from every launcher. Once hit, a target changes color to indicate what it has been hit by.
In the image above the upper left target has been hit by the red launcher and the upper right target has been hit by the blue and green launchers (turning it cyan, both blue and green). Hitting this target with the red launcher will explode it. Exploding all three targets with as few pusher-adds as possible is the goal.
Currently, the red launcher fires down the middle of the board, to the left of the intended target. (Hitting the red target again from the red launcher accomplishes nothing.) To deflect a projectile into the target we need to push the projectile right, and to push it hard right we should probably also push it slightly up, slowing it as it crosses the pushers, giving them more time to push it right.
The image below shows a successful shot.
You can see a row of pushers in row 1 that are aimed mostly right but slight up. If you examine the control panel, however, you will see that the last row I added was row 1, aimed down, at 40% power. Why? Well, my initial pusher row, 100% at 45 degrees, actually stopped the projectile’s downwards motion and then tossed it up and off the board, so I used a weaker downward pusher to reduce the strength of the original pushers. Pushers always add together, using basic vector addition rules.
And that’s what you need to know to start!
What About Two-Player?
Assuming you’ve read the single-player quick start two player has only two more rules. First, there are rounds that players alternate between. Most rounds have two moves (a move is either shooting or adding a vector) but the first one only allows a single vector add (otherwise player one has too great an advantage). In the image below you can see in the control panel that it is Player 1’s turn (Player 1’s information is in bold), which color each player controls, and that Player 1 is out of moves. Player 1 should click “End Round” to pass control to Player 2.
Second, each player now controls two launchers of the same color, and it’s no longer necessary to hit a target from both launchers. Instead, a target will explode from any three shots from the same player. Each time a player hits a target they get a point. If you can explode the target before your opponent gets hits on it you can deny them points.
In the image above you can see how the color-coding works. Targets are colored from the inside out. The leftmost target has been hit once by a blue projectile. If it were hit again it would turn solid blue. If it were hit a third time it would explode. The topmost target has been hit twice by red projectiles, and once by blue, making it red all the way through, but red + blue (magenta) in the middle.
Advanced Options
Advanced options make use of credits. How do you get credits? Single Player 1) Hit the new “Trigger Disaster for Credit” button. Something bad will happen and you’ll get credits. The worse the disaster is the more credits you will get. 2) Explode a credit mine. These blue mines with a dollar sign on them explode whenever a projectile gets close. They are dropped randomly on the board when a target explodes.
Two Player 1) Skip a move for a credit. 2) Hit a target.
There are now several new projectile options available. Each of these has a credit cost written as (number C) after the projectile name. In single player mode rockets are free until you add special warheads, but in two player mode all rockets have a cost.
Shotgun
The shotgun throws a cluster of three projectiles at one time, at slightly randomized angles. This can be useful for hitting a target that is slightly off the main path. In two-player it can potentially one-shot a target
Shotgun in action.
Blaster Bolt
The blaster bolt fires a laser-like bolt that moves straight through the first square and a half without any deflection before becoming an ordinary projectile with the velocity a projectile would normally acquire from the launcher. This can be used to avoid unfortunate pushers in the first square.
Blaster bolt.
Piercing Round
Piercing rounds are like normal shots except that they are triangles and they do not stop when they hit a target. This means that if two targets are in a line they can both be hit with one round.
Item Deployer
Item deployers are rounds that explode when you click “Detonate” (which replaces “Shoot”) and drop an item where they are. Items can be found under “Warhead Options” and are the entries other than double power and shrapnel. Items are described further below the Rockets section.
Rockets Rockets propel themselves forward, constantly accelerating in their original direction of travel. This makes them hard to deflect, which can be both good and bad. They also explode when they get into proximity of the target. You can also explode them yourself by hitting the “Shoot” button again, which will become a “Detonate” button once you launch a rocket. This is not very useful for a normal rocket, but once a rocket is loaded with a special warhead this can be very useful. Most of the special options only apply to special warheads, but the Double Power option applies to regular, explosive warheads and doubles the size of the explosion.
Rocket being fired from the red launcher. Rockets blast flame from behind themselves to indicate the direction of acceleration.
Special warheads include the shrapnel warhead and a variety of trap warheads. Shrapnel warheads spray projectiles when they explode, effectively a rocket that triggers Shotgun when it explodes (although the angles of the projectiles are more extreme in Shrapnel, and their number can be increased with Double Power).
Traps/Items
Traps in VectorGrid refer to any stationary map element that interferes with projectiles. Most traps go away after a certain number of moves (the number depends on how they were triggered) but mines stay on the board until they explode (which throws regular projectiles off course and detonates rockets). Mines are also not something you can use as a projectile, and will only appear as part of disasters on the board. Projectiles armed with traps can be detonated to lay the trap, and the trap will stick around longer if Double Trap Time is applied. Traps can also be cleared with the Trap Clear warhead, which has a large explosion that both damages targets and removes traps.
From left to right: a horizontal reflector, a rabbit patch, and a hole
A mine, which cannot be deployed by the player.
Reflectors
Reflectors are what they sound like. They are blueish squares that bounce projectiles off of themselves. They are larger in one direction than the other, and you can select whether they will be longer horizontally or longer vertically.
Rabbit Patch
The Rabbit Patch option applies a speed doubler. These are translucent green circles that double the velocity of any projectile that crosses them. Want a double-power launcher? Explode a Rabbit Patch rocket right off the end of the launcher.
Blow a Hole in the World
Holes are only available as a rocket round in two player mode, because they serve only to make a mess. They make a hole in the board that any projectile will fall through, never to be seen again.
Non-projectiles There are also a set of buttons that have credit costs that can be used. These do NOT count as moves in two-player, and so a player can apply one while also using two moves. The ones marked “One Use” can only be used once per game.
Feeling Flushed applies a giant whirlpool/toilet bowl effect to the whole board. You pick the direction. This adds to the existing pushers, so don’t expect it to override some strength 800 monstrosity you’ve saddled yourself with.
Opposite Day temporarily flips the sign of all existing pushers on the board. This can be useful but is often very disconcerting when the effects wear off, especially because all pushers put down while Opposite Day was in effect stay aimed in their original direction.
Two player games can also make use of Mirage. Mirage is cheap because it’s more mean than it is useful, although under certain circumstances it’s clearly useful. It clones an existing target and loads the clone with traps. Half the time the “new” target that appears is the clone, but half the time the clone takes the place of the old target and the “new” target is the old one in a new place.
Mass Effect adds a slight “gravitational” effect, where all targets end up with weak pushers aimed at them.
The Mover
The Mover is a problem. And it moves, of course. Because this is not a game of speed and reflexes it moves based on your own moves. It displays its own information just under the “Shoot” button. Adding pushers reduces its counter by 2, shooting reduces it by 1. Once the counter reaches zero the Mover (a gray circle about the size of a target, with red or blue outline detailing and an image in the middle) teleports itself to the marker (the orange circle). A new marker appears, and so the Mover is, in this sense, entirely predictable.
The mover, sitting at the intersections of 1, 2 and C, D, is a pull-type mover, warping the squares it touches to pull projectiles towards itself. It will teleport to the intersection of 3, 4 and A, B when it moves.
Movers have two effects. One is their ability to “warp” the map. Push-type movers create pushers in each of the four squares they touch that point away from them, while pull-type create pushers pointing towards themselves. These pushers are not permanently attached to these squares. When the mover moves the pushers also vanish and appear at the new location. Push-type movers have a red design around the outside and pull-type have a blue design.
A push-type mover on the left and a pull-type on the right. Movers will also always have an image inside of the red or blue circle, not shown here.
The Mover’s second effect is its effect when it is shot. It blocks shots, which can be annoying by itself, but it also always has some effect when hit. This effect is listed in the mover information. In the image of a game with a mover above the mover will create a trapped duplicate target when hit. This is also shown by a unique icon on the mover, so after some time you can recognize a mover’s effect by its image.
Top row, left to right: the mover will move when it is hit, the mover will throw a shield of mines around itself when hit, the mover will permanently reduce its countdown between moves by one, and the mover will become nicer. Bottom row, left to right: the mover will repair a random target, the mover will throw random unpleasant traps, the mover will add a random row or column of pushers, and the mover will shoot out credit mines.
Some mover functions are good (like ones that produce credit mines). Some are neutral, like the ones that change how often the mover moves. Others are bad, like the ones that repair targets or drop traps. However, every time the mover is hit or moves it changes its effect. For this reason it is a bad idea to fire at the mover multiple times because you see a good effect. The first projectile will hit it, getting the good effect, and the following projectiles will trigger random effects as the effects change!
Basic Mover Effects
Attitude changes
You may see effects called “make mover nicer” or “make mover meaner”. The “attitude” of the mover is its odds of generating good, neutral, or bad effects. At higher difficulties the mover starts meaner. Attitude changes add together.
Repair
If the mover repairs a target the target acts as if it was hit one less time. Which launcher it removes the hit from is random, so this can be a real issue. However, you do keep the point for hitting the target, so as long as you can still repeat the shot you may be able to get a higher score this way.
Move faster/slower
The mover may move as soon as it is hit, or add five to its countdown when hit. These are once-off effects. It may also alter its basic countdown. Movers start by counting down from five before moving. However, on-hit effects may permanently add or subtract from this number.
Power
A mover’s power is the magnitude of the pushers it create. You will see options to both increase (double) or decrease (halve) that power. These stack together.
Add pushers
The mover can also add a random row or column of randomly powered and randomly aimed pushers.
Mirage
The mover can duplicate the mirage effect.
Death
The mover can be made to vanish if you hit it when it has this effect. However, in its death it will take a terrible vengeance on the board.
Throw/Shoot/Shield
The mover can also deploy any trap as well as credit mines. The method of deployment can be throw, shoot, or shield. Throw is symbolized as slightly-arcing lines in the icon. The mover creates fragments with random vectors and timers. These move across the map being pushed by pushers until their timer runs out and then they drop their items.
Shoot is symbolized by straight lines. The move blasts out several lines which place items where they end. They are completely unaffected by pushers.
Shield is symbolized by a circle of lines radiating out from the center. This is exactly how a mover creates a shield: eight lines like those in shoot appear, even spaced around the mover, and drop items at a set (close) distance.
This post was inspired by a friend of mine who sent me a diagram proposing a simple rule to identify whether a snake is venomous or not. I’ve seen three of these simple rules shared on social media and all three are wrong.
The most popular rule normally consists of a diagram that looks like the one below, except that it claims that all venomous snakes have triangular heads and all non-venomous snakes have round heads.
This work by Eric Butler is licensed under a Creative Commons Attribution 4.0 International License.
Vipers (by which I mean any snake in the Viperidae, including rattlesnakes, copperheads, and water moccasins) do tend to have triangular heads, although the head shape changes in response to the amount of venom in the snake’s venom glands. But pythons and boas also have triangular heads because they eat large prey and have to have large heads. Meanwhile, round heads are found on many other species, including mambas, which are some of the most venomous snakes in the world, and coral snakes, which are also venomous.
The next most popular rule looks like this diagram, except it claims that venomous snakes all have slit-pupils and non-venomous snakes all have round pupils.
This work by Eric Butler is licensed under a Creative Commons Attribution 4.0 International License.
This is simply not a helpful characteristic. Slit-pupils and round pupils are both found in venomous and non-venomous snakes. In fact, while putting this article together I found a site claiming that all venomous snakes have slit-pupils and all non-venomous snakes have round pupils, no exceptions. It had a photo of a python (non-venomous) to illustrate slit-pupils. (Even if this characteristics worked more reliably it would require being quite close to the snake, and slit-pupil eyes with expanded pupils can look a lot like round-pupils.)
The last characteristic is whether the belly scales on the tail are in one or two rows. The claim is that venomous snakes have one row and non-venomous snakes have two rows.
This work by Eric Butler is licensed under a Creative Commons Attribution 4.0 International License.
This characteristic (known as having a single anal plate or a divided one) is actually used by professional herpetologists and can be found in many field guides. However, while it can help identify what group of snakes a given snake belongs to it doesn’t tell you whether that group is venomous or not. Indeed, in a few snake species, individuals of the same species can vary in this characteristic.
What’s really going on here?
It turns out that all three of these characteristics are making the same mistake: they are taking characteristics that vary between the Viperidae and the Colubridae (or most colubrids) and attempting to use these to identify whether a snake is venomous or not.
In North America most venomous snakes (the rattlesnakes, cottonmouth/water moccasin, and copperhead) are vipers. Many other snakes are colubrids. This means that these shortcuts often seem to work in the United States. In South America there are some venomous colubrids and these rules wouldn’t work. In Africa, Asia, and Australia some of the most feared venomous snakes are elapids, including cobras, kraits, death adders, and mambas. Elapids and colubrids tend to match in the characteristics these shortcuts use.
However, even if you restrict your use of these rules to North America you run afoul of the coral snakes, venomous elapids found in the southern parts of the USA and into Central America.
The coral snake above has a small, non-triangular head, round pupils, and a divided anal plate. It also has distinctive, bright colors (although it has non-venomous mimics) and so you could learn to avoid those instead. But that won’t work in Central America, where some coral snake species are much duller in color.
What rules can you use?
Learn the venomous snakes in your area. Most snakes aren’t venomous (or aren’t venomous enough to harm humans) and so there’s normally a pretty short list of snakes to learn. For instance, where I live the venomous snake that people are most likely to run across is the copperhead. It has a distinctive pattern with only minor variations. Learning that pattern is far more effective than any of these rules, especially since the pattern will let you identify a snake that is visible only as a back half slithering away under cover.
How big a fish tank should you buy? Or, if you already have a tank, what does the size of the tank mean about what you can put in it?
Generally speaking extreme tank sizes (very large or very small) are hard to take care of. This is because there are two different things that make tanks difficult and they follow opposite trends.
Larger tanks are harder to take care of because maintenance takes longer. There’s more water to change, there’s more glass to clean, and there’s more of the tank bottom to siphon bits of food and feces off of. When I have to do a 50% water change on the 110 gallon tank at work I do it all through an automatic water change system attached to the faucet. Even given this it still takes enough time that I generally make sure no one is using that classroom for at least a whole hour.
However, smaller tanks are more difficult because when things go wrong they go wrong faster. Think about some of the things that could go wrong in a tank. Something could leach an acid or base (a new decoration, or new substrate) and change the tank pH. You’d need less acid or base to change the pH of a small tank. Rotting organic matter (extra food, a dead fish) could release ammonia. Again, you’d need less ammonia to bring the ammonia concentration into dangerous ranges in a small tank. Your heater could break (or the power could go out) and the temperature in the tank could drop. Again, a smaller tank will cool down faster (much faster, because of surface area to volume scaling). Generally speaking, more water equals more stability.
These two trends seem to cross somewhere around the 50-gallon range for freshwater. 50 gallons is enough water to be pretty stable, and so larger than 50 gallons is mostly just more work. (Of course, tank size also depends on what you want to keep in it. 50 gallons will be too small for some fish.) Note that saltwater organisms need much more stable conditions than freshwater ones and so saltwater tanks may continue to gain real stability benefits at larger sizes.
But I don’t have space, I need a small tank
This happens. I have a lot of tank space but I still want to stick an extra tank on my desk, and there’s not a lot of space there. Things to consider:
You’ll need to keep a sharper eye on a small tank because things will, as I said above, go wrong much faster. This is also true because it’s pretty easy to “under load” a bigger tank, but small tanks are normally running at capacity. This means there’s no margin for error.
Despite what lots and lots of pet stores will tell you five gallons is pretty much the minimum for a fish. Betta fish seem to be the most common targets for abuse in this regard. I consistently see 1 gallon or 1.5 gallon tanks sold for bettas, but bettas are really too large for these tanks, and it shows when you see the difference between a healthy and an unhealthy betta. There are some caveats in the five gallon limit, and there are some oddball fish that may be hard to find that can deal with very small pools of water in the wild. However, your standard pet store fish will do better in a five gallon and even some of the smaller schooling fish will really need a ten gallon1.
Not everything you can put in a fish tank is a fish. I have a small tank that is just live plants and dwarf cherry shrimp. They are small, they produce very little waste, and they eat the dead plant material and the algae that grows in the tank which makes the tank practically maintenance-free. Ornamental invertebrates are often easier to keep in small tanks than fish.
What about fish bowls?
Fish bowls are basically just death-traps. For starters, how do you filter one? There are ways around this but fish bowls are a horrible design that are generally too small, waste a lot of their footprint (a straight-sided tank would hold more water for the same footprint), and are a bad shape for attaching the necessary equipment to.
I know what fish I want. How large a tank?
There are no hard and fast rules without knowing the exact species of fish, but there are two general rules to keep in mind.
First, for individual fish, a tank should be four times longer than the fish, twice as wide as the fish, and twice as deep. Active fish will need more room (one reason very small tanks aren’t suitable for most fish – many small fish are active enough that they need more distance) and very, very sedentary fish can make do with less. A handful of fish species (banjo catfish, for instance) spend most of their lives immobile and don’t need this much room. Certain fish may also care more or less about particular tank dimensions. Bottom dwelling fish may not really need twice their body length in tank height because they may never swim much above the bottom. Angelfish, which are “tall” fish, definitely need that height.
This shows the (rough) size of a tank for a particular fish species. The tank should be 4 body lengths long and 2 body lengths high and deep. This work by Eric Butler is licensed under a Creative Commons Attribution 4.0 International License.
Second, there’s a general inch-per-gallon rule. A twenty gallon tank can hold about twenty inches of fish. Some fish have strange body shapes and so this doesn’t work (twenty inches of twig catfish is less total fish than twenty inches of cichlids) but it’s a general rule. The scaling ratios between linear dimensions and cubic volumes also means that this rule can’t possibly be applicable across the full size range of fish people buy for fish tanks and so the rule probably only works for “medium” fish. However, if you’re about to drop fish totaling forty inches into a twenty gallon tank you’re probably headed for disaster.
I had to write a lot of zoology text recently, covering classification (not as thoroughly as I’d have liked) and vertebrate diversity. I’ve placed it under a Creative Commons License (CC-BY 4.0) and made it available here.
It’s important to choose whether you are going to go with freshwater or saltwater before you cycle your filtration, so it’s a decision that needs to be made early. It’s also important to choose because you can’t mix freshwater and saltwater fish in one tank.
Why Can’t We Just Mix Fish?
Everyone, and I mean everyone, seems to want “a Nemo”. I’ve been asked about a tank for “a Nemo” (a clownfish) half a dozen times in the last year. Problem is, clownfish are saltwater fish. You can’t just throw them in with your goldfish (for multiple reasons) and expect anything good to come of it.
The reason you can’t mix saltwater and freshwater fish has to do with osmosis. Osmosis is related to diffusion, where molecules move from high concentration to low concentration. If you drop food coloring in a glass of water the food coloring spreads out. This is diffusion. If you blocked the food coloring from moving with some sort of membrane that allowed water to move through it the water would move instead. That would be osmosis. Instead of the food coloring spreading out into the water the water would come to the food coloring.
Now imagine a fish. At a cellular level all a fish is is a bunch of bags of slightly salty water. It’s not all salts, but there’s stuff dissolved in the fish. There’s less stuff dissolved in freshwater and more stuff dissolved in saltwater. So when a fish is placed in freshwater there’s more stuff dissolved in the fish than the surrounding water and water tries to move into the fish. A fish in saltwater faces the opposite problem. Somewhat bizarrely it actually loses water to the surrounding ocean.
Most of this water loss or gain takes place in a fish’s gills. Gills are, at their most basic, thin blood vessels that are surrounded by water. Under the gill cover of a bony fish (the operculum) the gills look like red feathers, each filament of the “feather” being a blood vessel. This works wonderfully for fish because fish blood is normally lower in oxygen than the water (since the fish used oxygen in its cells), higher in carbon dioxide (since the cells produced CO2 in the same process that used oxygen), and higher in ammonia (which we discussed last article). This means that, without the fish doing anything but pumping blood through the gills, oxygen enters the fish’s blood and CO2 and ammonia leave. However, there’s no way to allow these things to diffuse across the blood vessel and not let water through, and so the fish also deals with the loss and gain of some things it would rather not have moving in and out of its body.
However, fish are well-adapted to live in the water. Freshwater fish are adapted to deal with a constant influx of water by having ways to constantly push it back out. Saltwater fish do the opposite. A few fish are euryhaline, meaning they can deal with a wide range of salinities, and these fish can generally change their physiological strategy based on the water they find themselves in. (I still wouldn’t recommend moving a euryhaline fish directly from freshwater to saltwater. It might require hours, days, or even months to switch over.) (A few fish deal with this issue in an entirely different way, where they match the salinity of the water around them, but these aren’t fish you tend to keep in aquaria.)
Now imagine taking a freshwater fish, like an oscar, and dumping it into saltwater. The oscar is pumping water out of its body because it normally has water flowing in. Now water is flowing out, and the oscar is just making it worse. In short order the oscar will be dead. If we move our clownfish into the oscar tank the opposite thing will happen with identical results. The clownfish will pull water in even though water is now rushing into its cells. Its cells will begin to lyse (explode) and it will die.
This grid shows a freshwater fish (an oscar, Astronotus ocellatus) and a saltwater fish (an ocellaris clownfish, Amphiprion ocellaris) in both fresh and salt water. The depth of the blue indicates the salinity of the fish and the surrounding water. The black arrows indicate the direction that water travels by osmosis (towards the saltier area) and the purple arrows indicate the direction the fish moves water to compensate. As you can see, when a fish is in the correct environment the arrows are in opposite directions, which keeps the water level inside the fish constant. When the fish is in the wrong environment the arrows are in the same direction, and so the fish’s own physiology exacerbates the osmotic problem, leading to the fish’s death. This work by Eric Butler is licensed under a Creative Commons Attribution 4.0 International License.
So don’t mix freshwater and saltwater fish.
Ok, So How Do I Decide?
If you have your heart set on a particular species then you need to go with that water type. But if you’re flexible on exact fish here are a few basic rules.
Saltwater gives you a greater variety of non-fish things to put into a tank. Saltwater gives you the opportunity to go for a reef tank, which is full of corals, crabs, shrimp, tube worms, clams, and perhaps echinoderms like starfish or sea urchins (although be aware that starfish often die rapidly in tanks – at least rapidly for starfish). For some people this is a big draw, and reef fish are very pretty fish. I run a small saltwater tank that is nothing but some easy corals, snails, and crabs. I like it a lot, and the small animals make up for some of the big disadvantages of saltwater tanks. The flip side of this is that some of the odder animals sold for saltwater tanks are so poorly understood that it’s almost impossible to even get accurate advice for keeping them alive.
Saltwater is much more expensive. Not every item and every fish is going to be more expensive, but I have paid between $1-$14 per fish for freshwater fish and between $6-$25 for saltwater fish. I’ve never seen a freshwater fish that I wanted that I thought was too expensive (which is to say I’ve seen expensive fish, they just aren’t frequently seen or interesting to me). I’ve skipped on buying dozens of saltwater fish because of price. Now, maybe I’m just cheap, but this is something to consider. This price difference is due to some of what follows.
Saltwater fish are much harder to keep. One really obvious difference between the ocean and freshwater is size. Oceans make up about 66% of the planet’s surface and freshwater makes up about 0.02%. Saltwater fish live in enormous bodies of water while freshwater fish normally don’t. A lot of the freshwater fish popular in tropical fishkeeping come from small creeks or pools (although, contrary to often-repeated opinion, wild betta fish do not actually live in puddles [although some killifish have been reported breeding in puddles]).
Imagine a small creek running through a tropical area in which there is a distinct wet season and a dry season. In the dry season the water becomes hot, more polluted with fish waste (because there’s less water per fish), and because the water isn’t being replaced it ends up with more of whatever it picks up from the creek bed (which may make it more acidic if the bottom is mostly dead plants, or harder if the bottom is certain sorts of stone). When the rains come the water volume may triple in a day. The new water is colder, cleaner, neutral to slightly acidic in pH, and has nothing dissolved in it. If the fish can’t survive these huge changes in the water they live in they’ll die out as a species. Now imagine the ocean. It doesn’t rain for six months. Nothing changes. It rains for a month straight. Fish right at the surface notice the influx of cold, fresh water, but fish ten or twenty feet down probably don’t even know anything is happening. And so, as a direct result of their environments, freshwater fish tend to be much more tolerant of temperature change, pH changes, water hardness change, and those nitrogenous wastes I talked about in the filtration article. Saltwater fish, on the other hand, are much more likely to die when anything changes. This not only makes the fish more expensive, it also means you need a lot more equipment to keep saltwater fish alive.
You should think about a bigger tank for saltwater. Actually, bigger tanks are easier in many ways (which I’ll discuss in another article), but since saltwater fish come from such large environments the advantages of a larger tank are all magnified for them.
You are also much less likely to be able to breed saltwater fish at home. Maybe you don’t care about this, but if you ever want to try to breed fish freshwater fish are much easier. With guppies the challenge is to prevent them from breeding. A few saltwater fish (like some cardinalfish) have been successfully bred in the aquarium, but most can’t be. (This also means that if you’d like to avoid buying fish that have been caught in the wild, perhaps in ways that aren’t very good for the environment, you have more choices in freshwater.) The reason for this is that the ocean has a very different current system than freshwater. Freshwater basically all flows to the ocean. The ocean, however, has loop currents. A number of oceanic species lay eggs that float on these giant currents, hatch out into larvae that look very different from their parents (and live a drifting life far above the bottom), and eventually circle back home (or another suitable area) where they become “normal looking” and start acting more like the adults. Freshwater fish tend not to do this, since having your eggs blown constantly downstream isn’t such a good idea. This means that plenty of freshwater fish will lay their eggs on the ground or on plants and a fish keeper can take care of them, whereas many saltwater fish lay eggs that just go straight into the filter with all the other floating debris.
My quick advice would be not to go for saltwater unless you really, really want a particular fish (or are rich and retired). Saltwater tanks are more expensive and much more work.
Recently one of my friends asked me about a device, about the size of a gas-mask filter, that claims to extract enough oxygen from water to allow you to breathe while submerged. He had some thoughts about the mechanical details and whether this device could outperform gills, but what he asked me was, essentially, this: if you had gills how big would they need to be? This is an interesting question1 and so I thought I’d share a detailed, sourced answer.
Let’s start with some basic fish biology drawn from Bone and Moore’s 2008 general ichthyology text, Biology of Fishes. A typical 1 kg fish has 18,000 square centimeters of gill lamellae. These gills extract 70-80% of the oxygen available in the water. This is such a big task that around 30% of the blood resistance in a fish’s circulatory system is in the gills2.
If we simply scaled this up to a 70 kg human3 we’d get 126 square meters of gill lamellae. This isn’t the number we want, though, since approximating a 70 kg human with a pile of seventy 1 kg fish isn’t accurate4. There are issues both of scaling efficiency (larger animals tend to need less oxygen per kilogram) and metabolic rate (humans are much more energy-hungry than fish on a kilo-per-kilo basis). What we actually want is a metabolic rate for our 1 kg average fish and a human metabolic rate5 so we can scale from there.
Clarke and Johnson (1999) estimated the metabolic scaling equation for teleost fish overall. Since teleost fish encompass more than 90% of all fish species a teleost fish equation is probably pretty close to a generalized fish equation. The equation from Clarke and Johnson is ln(metabolic rate as mmol of oxygen per hour) = 0.8(ln(body mass in grams)) – 5.43. A 1 kg fish would then need 1.101 mmol of oxygen per hour.
Ravussin et al. (1982) measured subjects of varying obesity and determined that non-obese subjects used 6,118 kJ a day for their resting metabolism. Leonard (2010) states that in humans 1 liter of oxygen is equal to 5 kcal of energy. Working through a lot of conversions (1 mol of oxygen is 1,000 mmol and is 22.4 liters at standard temperature and pressure, so that’s 44.64 mmol/liter, 5 kcal is 20.92 kJ so that’s 2.13 mmol/kJ, 6,118 kJ/day is 254.9 kJ/hr) we get 543.98 mmol of oxygen/hr. So, if an average, non-obese human needed to get by with gills we’d be looking at 889.4 square meters of gill lamellae just to meet basal metabolic needs.
Now, if you’re following all of this you may see a problem: that gill area/mass ratio is for a fish in total, not a fish that only rests. But we’ve calculated this for a human that only rests. Surely fish have some built-in safety factor which will help us out here. However, we exercise using mostly aerobic muscle activity, and fish exercise using mostly anaerobic muscular activity. Fish also use about 10% as much energy as land mammals in locomotion (both of these facts come from Bone & Moore, 2008). So whatever the safety factor a fish has to let it engage in fast movement that safety factor is going to be far too low for a human.
So what would 889.5 square meters of gill lamellae look like? This is hard to figure out. Gill lamellae are very small and tightly-packed, and so a lot of surface can fit in a small area. However, our average human now has gills 494 times larger than our 1 kg fish. Imagine a medium sized trout. Now imagine the gills – the full, feathery, red structures behind the operculum (gill cover). Now imagine basically 500 of those. If the trout had a mere cubic inch of gill our hypothetical human would need 0.29 cubic feet of gills. Of course, that much gill tissue would change the water flow through it in ways that would force changes in the gill dimensions as well, and so an actual cube of gill tissue would have dead spaces in it and would need even more tissue. Instead, the best design would probably be more like stacked wings of tissue, probably about the size of a person’s head. Remember, that’s a minimal gill that will let you breathe underwater but not really move around (or panic). If you were planning on living underwater, instead of just hopping into the water and drifting with the current, you’d need gills probably at least twenty times that size, since activity can easily use twenty times as much oxygen per minute as resting.
Sanity Check
These numbers appear strangely large. Would you really need gills twice the size of your torso to sustain you swimming around underwater? And it is possible I made an mathematical error. However, the sanity check suggests that this is probably about right.
First, that oxygen use rate is about 8 times higher for our hypothetical human than our fish on a kg-for-kg basis. (We’d need the exact weight of Ravussin et al.’s subjects to do better.) Since endotherms, like humans, tend to have metabolisms about ten times faster than ectotherms (like the vast majority of fish) we’re running clearly in the sanity zone on that one, perhaps even lowballing human oxygen needs (although large animals, like humans, are more efficient per kilogram than small ones, like our 1 kg fish).
Second, what’s a comparable animal? A great white shark is a large, endothermic fish. Its gills take up an area behind its head about as long as the head length. Great white sharks are also have lower body temperatures than humans (which reduces energy use) and are very streamlined, hydrodynamic swimmers, which means they use far less energy moving than humans do. (Humans, and all walking animals, use lots of energy in their limbs just holding themselves off the ground, while swimming animals can use all or almost all their energy moving themselves forward.)
Thirdly, what are swimming mammals doing? Not using gills. Water, under good conditions, only holds about 3% as much oxygen as air does. This means that gills should be larger than lungs for a given oxygen demand. If we ran the numbers based off of this we’d get gills that were 33 times larger than lungs. However, gills are more efficient than mammalian lungs (see the 70-80% oxygen capture rate quoted above) and so we can probably reduce the gill size by a factor of three. That would give us gills 11 times larger than lungs.
All in all, the gill sizes we’ve estimated seem reasonable, if extremely large.
Bone, Quentin;, and Richard H.; Moore. Biology of Fishes. Third Edit. New York, New York: Taylor & Francis, 2008.
Clarke, Andrew, and Nadine M. Johnston. “Scaling of Metabolic Rate with Body Mass and Temperature in Teleost Fish.” Journal of Animal Ecology 68, no. 5 (September 1, 1999): 893–905. https://doi.org/10.1046/j.1365-2656.1999.00337.x.
Leonard, William R. “Measuring Human Energy Expenditure and Metabolic Function: Basic Principles and Methods,” Journal of Anthropological Sciences 88, (2010): 221-230.
Ravussin, E., B. Burnand, Y. Schutz, and E. Jéquier. “Twenty-Four-Hour Energy Expenditure and Resting Metabolic Rate in Obese, Moderately Obese, and Control Subjects.” The American Journal of Clinical Nutrition 35, no. 3 (March 1, 1982): 566–73. https://doi.org/10.1093/ajcn/35.3.566.
Yesterday evening I watched the premiere episode of “Extinct or Alive”, Animal Planet’s latest entry into the genre of cryptid1-hunting TV shows. I have a love/hate relationship with these shows, in that I love watching them so I can hate them. Most of them are excellent demonstrations of the vast gap between what laypeople think wildlife science looks like and what actual scientists do. Animal Planet, especially, has been a repeat offender with these sorts of shows, putting out lots of shows in which people search for cryptids but, in the process, make outrageous claims, demonstrate a lack of basic information about science, or just do stupid things that make no sense. “Extinct or Alive” is much, much better.
I have long believed that a good cryptid-hunting show could help explain science to people. Why doesn’t your eyewitness account of a Bigfoot establish it for science? Well, let’s see what a proper investigation which would meet scientific standards would look like. This would demonstrate the difference between “I am saying that I saw” and “we have evidence other people can examine”. “Extinct or Alive” is basically this show, although it’s not perfect.
Let’s start with the bad. I expected lots of bad (hence the title) but my actual complaints are few.
First, there’s not a lot of clarity on how different the Zanzibar leopard (the subject of the first show) is from mainland leopards. It would be easy to believe that most scientists believe it to be a separate species, when the range of opinions seems to range from “subspecies” to “very mildly different African leopard”.
Second, there’s the constant mention of the coelacanth. Admittedly, the host (Forrest Galante) has a personal connection to the story of the coelacanth’s rediscovery, but the coelacanth is a pretty odd case. Whether a deep-sea fish can make it millions of years without being recorded as a fossil is pretty different than the question of whether a big cat species can survive on a heavily-populated island.
Third, Forrest has a tendency to talk about himself as a lone wolf maverick, and yet in the first episode he is in contact with two other people working on this issue! Forrest seems to bring some real expertise to the table (unlike many other cryptid-hunter hosts) but it’s clear that it didn’t take Forrest to get people interested in the issue of species that may not really be extinct. Forrest also has the unfortunate habit of talking about the species he is looking for as if they are alive and need our help to stay this way, when this is only hopefully true of them.
But what about the good?
First, this is a cryptid-hunting show, not a monster-hunting show. The Zanzibar leopard is treated as a real cat. Nobody claims that it is the most dangerous animal on Zanzibar or that people lived in constant terror of it. Oddly, this is sort of true in Zanzibar – it was the largest big predator (aside from humans) and its reputation as a witch’s familiar did make people view it with real suspicion. However, Forrest treats this as an animal whose persistence into the present needs to be verified for conservation issues. This is in marked contrast to a show I once watched about the potential for thylacines to still be alive, which spent every spare minute trying to convince you that what was effectively a marsupial coyote was a deadly killer.
Second, the creature under investigation skews towards the plausible end of the spectrum. Zanzibar is under-studied enough that since the Zanzibar leopard’s supposed extinction date a subspecies of servaline genet was discovered there, and in the 22 years between that discovery and the filming of this episode of “Extinct or Alive” only two photos of that genet had ever been taken. (As it turns out, “Extinct or Alive” managed to improve that number. This only reinforces how easy it is to miss animals in Zanzibar.) Moreover, the leopard was known to have been there (it’s a known species, not an entirely new one) and the gap between now and its disappearance is only a matter of decades, not centuries or (in some of the crazier cryptid cases, millions of years).
Third, Forrest appears to know about animals. In my coelacanth article (referenced above) I made fun of “Expedition Mungo”, a show that lives on in infamy for several reason, one of which is the show’s host picking up a very human-like (although also clearly non-human), but very small, skull off the forest floor in Africa and asking someone what it was2. A monkey. Seriously, what other options were there? Forrest, on the other hand, seems to be a decent naturalist, and shares his love of animals with the viewer. Again, this reinforces the “looking for poorly-known creatures” angle against the “looking for monsters” angle so many other shows have.
Fourth, alternative hypotheses are made on-camera. Alternative hypotheses are extremely important in science, but many cryptid-hunters seem convinced that every small sign of a cryptid is proof positive. Forrest gets footage of something spotted very, very close to his trail camera and proceeds to explain that while this could be a Zanzibar leopard it could also be a servaline genet. In fact, after working you up about how this could be a leopard he pops your bubble with the second hypothesis. This isn’t just correct, it’s a good pedagogy, since people who were convinced that they were looking at a leopard will suddenly lose confidence and, hopefully, be more careful about such confidence in the future.
Fifth, the show spends time on actual science. Forrest gets a good, uninterrupted chunk of time to talk about sampling protocols and the importance of collecting as much data as possible. I think they cut the scene before he finishes actually writing the date on the sample container, but you understand why he is doing this, and frankly I don’t need to watch him write it out, I liked the fact that he explained to the audience why you always write the date, the time, and the location on your sampling containers (along with marking the point in your GPS, even if you’re pretty sure this sample isn’t the species of interest – all of this was mentioned by Forrest on camera).
Sixth, the show got what are really impressive results for such a short time frame. (Yes, I could complain about doing science as a travel show where the main scientist hops from continent to continent, but if it funds some actual science I’ll live with it.) This isn’t the good thing. The good thing is that the show gets results that would send many other shows over the moon and then Forrest says that it isn’t enough. The burden of scientific evidence hasn’t been met, and explains what else he will need and starts working on collecting that data. So, by the end of the show you have good reason to believe that the Zanzibar leopard is not extinct but you are also aware that Forrest believes that he needs DNA evidence to absolutely prove that this particular type of leopard is really present. Moreover, you know from the end credits that there is continuing work on that front – Forrest coming in with some cameras wasn’t the end, it was the preliminary work to a longer project.
So, what could ruin this for me? Well, if the problems I mentioned get larger and the good points get smaller that could make the show worse. What I really want to see, though, is how the show handles definitively poor evidence. What happens when they go somewhere and literally every lead is a dud, and it becomes apparent to us at home that there never was anything to this story except hoaxers or mistakes? Will Forrest say on-camera that he thinks there isn’t anything there, that the species he targeted really is extinct? Or will we get the all-too-typical hand waving and the promise that there’s always missed evidence?
However, for now, I think this show teaches some good science in an interesting way. Let’s hope that continues.
UPDATE: Also SPOILER. In the second episode Forrest does not find what he’s looking for. However, he does find something else which matches the descriptions he was given of the mystery creature fairly well. He’s pretty up-front that he thinks the villagers are not describing the extinct species he was looking for but this other rare, but known to be extant, species. Good job, Forrest!
ReactionTimer, released today (although in secret beta on this site for several months), is exactly what it sounds like: a reaction timer. However, it also provides a number of challenges that are designed to time your reaction time plus the time required to perform some mental task. This program is deliberately smartphone-friendly.
Basic usage consists of these steps:
Select a challenge from the list of yellow options. (Your current selection will be white text on a black background.)
Click “Start Challenge”. You will have a brief window of time to move your cursor/finger over the large button that says “Click on go”.
The the dots (…) above “Click on go” will change and some sort of signal will appear.
If the signal is correct click “Click on go”. Otherwise wait for the correct signal.
Once you click (correctly) your time will appear and will be logged on the screen below the buttons.
The image above shows a screenshot of the program as it might appear on a smartphone1. The tail end of the list of challenge options can be seen at the top, followed by a black-bordered block containing the instructions for this challenge type. Below this is the word “GO!”, the signal for this challenge, and under “Start trial” is my time for this challenge. Below “Click on go” is a chronologically-ordered list of my times, with the most recent at the bottom.
In this case we can also see the use of ReactionTimer. The change from “Countdown” to “RandomGo” has added 189 milliseconds to my reaction time. By trying different challenges one can actually measure the time required to mentally process the signal.
Challenge Options
Countdown is the simplest challenge. After a brief moment to allow the user to prepare the screen shows a countdown – 3, 2, 1, GO!. The timing is the same at each transition which allows the user to click “Click on go” when “GO!” should be appearing and not actually wait for the signal to be processed by the brain.
Random Start is perhaps the best measure of actual reaction time. The signal area remains as the starting three dots (…) until, at random, it changes to the word “GO!”. The signal is clear and unambiguous, the only challenge is waiting for the visual processing of the signal.
When Word is Go draws randomly from a list of words. These are all sorts of words, but all are capitalized only on the first letter, except for “GO!”. The transitions between words occur at regular intervals, but the user must still identify what the word is.
When Word is Go (Annoying) also uses a random list of words, but unlike normal When Word is Go all of the words are two letters, capitalized, and followed by an exclamation mark. This makes them less visually distinct from “GO!”.
When Word is Animal lists random words, some of which are the names of animals. If the random word is the name of an animal the user should tap “Click on go”. Unlike the previous challenges this challenge incorporates multiple correct answers, which makes it noticeably harder, as the user’s brain has to process what the word is, not just whether it is or isn’t one specific word.
When Word is Not Animal is the opposite of When Word is Animal. Is it harder to parse a negative than a positive? Now you can see!
When Word is Adjective lists random words, and the go-signal is when the word is an adjective. Care has been taken to supply the list only with words that are clearly adjectives or clearly not. However, this one requires a great deal more mental processing than the previous ones.
When Addition Problem is Right supplies the user with a simple addition problem (two numbers, both under 10, and their sum). Most of the time the sum is not correct. (Under the hood ReactionTimer adds up the numbers correctly and then normally adds or subtracts a small, non-zero, random number.) When the numbers actually add to the displayed sum the user should click. This one gives the user more time between transitions than the previous ones.
When Colors Match presents the user with a colored square and the colored word “Text” (see below). When the colors of both items are the same the user should click. This one largely lays the groundwork for later challenges involving color and allows the user to get a baseline reading for recognizing color matches.
When Color is Right involves the Stroop Effect. Instead of a colored block and colored text that says nothing useful the colored text is also the name of a color. When the name of the color and the color of the text match (e.g., the word “Green” in green) the user should click. Honestly, this one drove me nuts every time I tested it.
When List Ascending presents the user with a list of four numbers (e.g., 8, 10, 21, 31). If the list is ordered so that each number is larger than the number to its left the user should click. (So, for instance, the user should click if presented with my example list, but not if it had read 10, 8, 21, 31.) This forces the user to make multiple evaluations (three, specifically) to solve the problem.
When Word is Not Animal + Color Match combines two previous challenges. This is meant to allow a user to see if evaluating two different challenges is harder than evaluating just one, and if the difficulty is additive. This one can be used alongside When List Ascending to see the difference between the same evaluation multiple times (“is this number larger than the one on its left?”) and multiple types of evaluations. In this case, in case this is unclear, a colored square and some text will appear as in When Colors Match. However, unlike When Colors Match the text will be a word. When this word is not the name of an animal and is also the same color as the colored square then the user should click.
All of these challenges together are meant to allow a user to evaluate the time required to perform a whole suite of mental tasks as well as to evaluate how combining tasks affects processing time. There are definitely other options that could be added, although this set seemed to me to capture most of the main comparisons I was interested in. However, I welcome feedback if there are additional challenges that could be added to capture new dimensions of mental processing.
The reason I am writing this series of articles is because it turns out that one of the things I get asked about most is keeping fish. Sure, I could talk about what biogeography tells us about the evolution of Siluriformes, but people seem to want to know why their guppies are dying. So here’s a series of articles on setting up and maintaining a fish tank and the science behind it. If you want a quick, simple, here’s-how-to-own-some-fish guide this isn’t for you. This is a science blog, so I’m going to tell you not just what to do but why. That way if you can’t use my favored approach you’ll be able to make an appropriate substitute, or at least you’ll know why your guppies are dying (and then hopefully stop buying more and condemning them to death).
This article series is also aimed primarily at people who want relatively unfussy tanks. This is partly a demand issue, where there are far more people who want a low-maintenance tank with some pretty fish in the living room than people who want to breed rare Central American fish in a basement fishroom. This is also partly an issue of knowledge: people running their own complicated set-ups are likely to already know this stuff, and I am also less knowledgeable about complicated set-ups. I have a lot of fish tanks in my teaching and research labs but most of them are deliberately set up so that if I miss a water change during finals week nothing bad happens.
Our first article is about filtration because filtration is how you are most likely to kill your fish. If you are saying, “I don’t have a filtration issue because my water looks clean,” then this is you for sure.
The short take-home, for people who really wanted a different sort of article, is:
Filtration is mostly about getting rid of invisible fish waste.
Biological filtration is where it’s at.
Biological filtration requires you to cycle your tank BEFORE you add fish.
Ultimately, filtration can only save your fish for so long, so you’ll need to change the water periodically as well.
Fish are Toxic Waste Machines
Fish are little toxic waste machines. Filtration is generally divided into three different varieties (mechanical, chemical, and biological) but the first and most important thing to understand about filtration is that a perfectly healthy fish in perfectly clean water will, as a direct product of its metabolism, produce toxic waste which needs to be filtered out. Time and time again I see people asking for help on fish-keeping forums who are sure that their fish caught a disease and need medicine when their fish have merely, but largely literally, peed until their water became toxic. And, instead of changing the water to remove this dangerous waste, these people often spend money buying treatments that, at best, treat the wrong problem and at worst kill the very organisms that will help them solve that problem.
The central issue here is that a fish tank is not a closed ecosystem. Fish tanks are not closed ecosystems because, most importantly, you feed the fish. While there are lots of things fish may eat all fish eat products that were once alive (other animals, plants, or single-celled organisms). What is most important here is that all living things contain at least trace amounts of protein. Even plant food, which is generally considered to be protein-poor, has small amounts of plant enzymes in it, and those enzymes are proteins. Moreover, many fish eat relatively protein-rich animal food, and all fish need to eat protein to build their own protein-rich bodies. The problem with this is that protein contains nitrogen, and lots of it. When protein is used to build more protein (i.e., a fish eats a worm and converts some worm-proteins into fish-proteins) that isn’t an issue. However, when protein is used for energy, which is also very common (and impossible to prevent, before you ask if you can feed a special diet that will stop this), the nitrogen in the protein just becomes waste. What it becomes as part of the metabolic process is ammonia (NH3).
This sealed ecosystem requires no filtration because: 1) it’s sealed, with no added food 2) it supports nothing larger than the tiny dots swimming in the water. (And it does have the biological elements of biological filtration, just no pump driving water through.)
This is where the problem starts. If you’ve ever used ammonia as a cleaning product you are probably familiar with its toxicity (and with the fact that it looks just like water). Even smelling ammonia can make your nose and eyes burn. Ammonia is so toxic that in land vertebrates energy is expended to transform ammonia into something less toxic (either urea or uric acid, depending on what sort of land vertebrate you are1). Fish2 have the luxury of being surrounded by water and so instead of storing urea or uric acid for later excretion they simply dump the ammonia into the water. This actually happens largely through the gills. While fish do urinate like land vertebrates they also have a large area in the gills where blood is a thin membrane away from the surrounding water (if this weren’t true they wouldn’t be able to extract oxygen from the water) and ammonia simply diffuses out of the bloodstream. In the wild this ammonia would be dispersed across gallons and gallons of water. In a fish tank the ammonia can’t go anywhere and so it can rapidly accumulate to dangerous levels.
Fish waste isn’t the only source of ammonia in a fish tank. Dead animals also produce ammonia as they decay, since bacteria causing a body to rot are just eating it, and dead animals are full of protein. These dead animals may be a fish that died while you were gone for the weekend, or a snail that you didn’t realize came in on a plant and which has now died, or the bits of dead animals in the food your fish didn’t eat.
Filtration
Filtration is commonly divided into three categories, and so I’ll go through them under the normal titles.
Mechanical Filtration Mechanical filtration is what people who just got their first fish tank tend to worry about most. Mechanical filtration is about removing the “bits” that make the water look dirty. It normally involves some sort of pad or grating that catches these bits and has to be cleaned off or changed out on a regular basis. Two important things to note about mechanical filtration are:
1) The fish mostly don’t care. Sure, getting rid of bits that will rot reduces ammonia, and that’s good, but fish live in water that is muddy, full of sticks, or stained with tannins all the time. Some fish do like or maybe even need crystal-clear water but other fish actually prefer water that is hard to see through. I have some fish in my lab that live in water the color of weak coffee. Originally their tank was clear water, but after some reading I discovered that these were fish from blackwater environments where tannins leaching from dead plants turn the water brown or black. I added these chemicals and the fish are much more active now. Mechnical filtration is largely something you do to make your fish tank look nice to you.
2) You should be doing water changes, and when you do this you should be using a siphon. It’s a lot easier to get rid of visible fish feces and old food by siphoning it out than it is to rely on a filter to do this. With a siphon you can also stir up your gravel to get out things that have become trapped between the pieces. (If you have a sand bottom everything will collect on the top.) I have largely abandoned mechanical filtration except for this siphoning in my tanks.
Chemical Filtration
Sometimes you have weird chemicals in your tank. Chemical filtration deals with these. These can come from a variety of sources – something you put in the tank as a decoration, something your water treatment company put into the water, or some off-kilter biological process. The most common chemical filtration you will see is activated carbon (charcoal) filtration. These filters use either loose activated carbon or bags of activated carbon to remove harmful chemicals from the water. This is exactly what most drinking water filters for home use use. A few important notes about chemical filtration:
This is loose activated carbon. It is often sold in a white cloth bag instead.
The most worrisome chemical, unless you (or your child) throw random things into the fish tank, is the chlorine or chloramine your water treatment company probably adds to your water. This stuff kills bacteria quite nicely, which is a problem in your tank (biological filtration depends on a colony of beneficial bacteria to work) and also burns fish gills. I have a friend who changed water in their tank and didn’t remove the chlorine first. Within two hours all of her fish had died of suffocation. You can trickle water through activated carbon to remove this but a better strategy is to get a bottle of water conditioner and add some to the water you are about to put in the fish tank. The only time I have ever run chemical filtration on a tank was when I once had a problem with wood staining the water in a tank that was supposed to stay clear. I added some activated carbon to the filter and within a week the problem was solved.
All chemical filtration runs out over time and has to be changed. Activated carbon filters eventually stop working and may even begin to shed previously-trapped toxins back into the water. Unlike biological filtration, which tends to improve over time, chemical filtration works best straight out of the box and gets worse over time.
I have an ambivalent relationship with chemical filtration. One thing I see far too much of is tiny plastic tanks sold with a “filter” that isn’t anything more than a way to suck water through a bag of activated carbon. These probably do save some fish from owners who dump water into the tank straight out of the tap without adding a dechlorinator or (shudder) use cleaning products to clean out the tank and leave chemicals behind. They also probably make a killing for the companies that make them, since the carbon bag will be regularly replaced, and my guess is that a lot of fish will also be getting replaced. On the other hand, a bit of activated carbon in a filter can save you from all sorts of chemical weirdness. I always keep some in lab for the day when someone knocks a strange chemical over into a fish tank. It hasn’t happened yet, but when it does I’ll be dumping that carbon in the filter.
This extremely tiny all-in-one tank was sold for betta fish (it’s suitable for shrimp). The filter consisted of nothing but a bag of activated carbon and a pump to pump water across it. I’ve helped this tank out by adding plants and putting a sponge over the filter intake (which serves as a place for biological filtration bacteria to colonize).
Biological Filtration
Biological filtration is your right-hand man, your best weapon, in the fight against ammonia. Far too often it seems that people go to a pet store and say that their fish are doing poorly. The store may ask to test the tank water (most places that sell pet fish will test your water for you, which is good to know) and they determine that the person in question has too much ammonia in their tank. So they sell them something like AmmoLock and the person goes home, treats the tank, and in a few weeks their fish are dead. I’m not saying that short-term ammonia-detoxifiers aren’t any good. However, they are short-term solutions. When you realize that you’ve got 2 ppm of ammonia (which is REALLY bad) something like AmmoLock will save your fish now. But what keeps you from having that 2 ppm next week again? Biological filtration.
I’m sitting about six feet from a fish tank that I built all the filtration for myself. It has no chemical filtration. It has mechanical filtration only by accident. What it does have is about 100 times as much biological filtration as a “normal” store-bought filter for a tank that size would have. (It also has live plants, which serve as backup biological filtration.) Biological filtration is filtration3 and everything else is making the tank look pretty.
The concept behind biological filtration is to make ammonia less toxic. One way to remove ammonia would just be to change the water in the tank constantly. In fact, some large aquariums “filter” their tanks exactly like that, pumping water out of the ocean constantly and sending the old water back. (It’s one reason so many aquariums are right on the waterfront.) However, if you can’t do that maybe you can make the ammonia less toxic so that it doesn’t cause a problem until the water does get changed. This involves converting ammonia into less-toxic nitrite and then converting nitrite into less-toxic nitrate. I said above that 2 ppm of ammonia would be very bad. 2 ppm of nitrate is nothing. I’ve had fish survive short periods in which the nitrates spiked above 100 ppm.
So how do you convert ammonia to nitrate? Several different kinds of bacteria do this4 to get energy. So, in effect, all you need to do is provide these bacteria with somewhere to live and then send them water with ammonia to “eat”. These bacteria also need oxygen. Hopefully, your water has enough of this, but a wet/dry filter design (which is a design in which the biological filter stays wet but isn’t submerged) really maximizes this.
This sump tank serves as the main filter for a 110-gallon salt water tank on the stand just above it. Water pours in through the hoses at the top, trickles through the filter media visible inside, and is pumped back to the tank. By trickling the water through the media in a shower-head fashion the media is exposed to both water and high levels of oxygen, increasing its effectiveness.
CYCLE YOUR TANK. Biological filtration depends on an entire mini-ecosystem in which fish produce ammonia which some bacteria use for food, producing nitrites, which another group of bacteria use for food and produce nitrates. There are no “out of the box” mini-ecosystems. You have to grow one in your filter before you can safely add fish. There are a few ways to do this.
There are directions for fishless cycling online. That’s what it will be called. It involves adding ammonia directly to a tank with no fish and monitoring the levels of nitrites and nitrates. Once the ammonia is reliably converted to nitrates in a timely fashion the tank is cycled.
You can feed the tank like there were fish in it. The rotting food will produce ammonia just like it would going through a fish. This doesn’t always work perfectly, since you may get the amount wrong, but it’s worked well for me. Mind you, I also follow all the extreme safety tips I give later about adding fish.
If you’ve got a large enough tank you can cycle it with some hardy fish (or invertebrates). Guppies work well for freshwater. The idea is simple: a 55-gallon tank can hold far more than a few guppies. If you add a few guppies the sheer volume of water will keep the ammonia concentrations low for a while and give the bacteria in the filter time to start growing. Once that seems to be working well you can (slowly) add other fish.
Cycling takes time. A lot of fish stores (that admit that you need to cycle tanks – some will pretend that you can just plug the filter in and go, probably because that way you’ll be back to buy more fish really soon) will say that it takes a week to cycle a tank. Cycling isn’t binary. A tank can be more or less cycled, and cycling probably continues for months or years, as ecological communities become more complex and shift in composition. I generally cycle for several weeks, and in one case a rather-accidental four months.
So can you cut down on the time to cycle a tank? Yes! And no.
You can buy a lot of products that claim to do this. I’ve heard that there is one refrigerated bacterial infusion that may or may not be available in the US that works well. However, most of these are just ways to pay money for something that is free. There are no products that can instantly cycle a tank and you don’t need to buy any products to cycle a tank. One of the major barriers here is that you need live bacteria of the right sort, and keeping bacteria alive in storage with no ammonia for food is hard. Another barrier is that I’m not sure we really know exactly what bacteria are involved in cycling a tank. Nitrosomonas and Nitrobacter are obviously important but there’s reason to suspect that this is a complicated story with a lot of ancillary characters.
However, you may know people who have live, complete bacterial communities available. These are people with working fish tanks. People such as myself, who have more than enough biological filtration, can often pull a sponge or some media out of a working filter and either drop it in your filter (or tank) or squeeze it out into the tank. This will look like someone just squeezed disgustingly dirty water in a nice clean tank but that “dirt” is the bacteria you need. This can cut cycling time by a lot. You do want to match water type as much as possible. Putting filter material from a saltwater tank into a freshwater tank is probably unhelpful. If your tank is tropical you will probably get better results from a tropical tank, and so on (but any freshwater tank should help some with any other freshwater tank).
It is possible to start a tank already cycled. It’s the filter that cycles, not the tank (mostly), so if you take a filter off a working tank and put it on a new tank it’s already cycled. This is most useful if you are moving small fish to a larger tank where they will grow larger. Imagine that you have a 10 gallon tank and just realized that the fish you bought will grow a lot larger than the fish store told you. You want to switch them to your new 40 gallon tank now before they grow larger and let them grow up in that tank. However, you don’t have a cycled 40 gallon filter. No problem! You only have 10 gallons worth of fish right now, so you can move the filter for the 10 gallon tank to the 40 gallon tank and start both filters. In a month both filters will be full of bacteria (the small filter will “seed” the big one) and the small filter will have carried you through the danger period. You can take the small filter off.
This homemade sponge filter is effectively filtering the water in a shrimp breeding tank. It does extremely poor mechanical filtration (despite some people claiming that sponge filters are mechanical-only) which saves the lives of the small shrimp, who can’t get sucked in anywhere. It does excellent biological filtration as water is drawn into the chunks of filter foam and expelled at the top. My sponge filters are uglier than many commercial ones, but also have a lot more sponge, which is probably why mine seem to work better. I could also easily pull one sponge block off and transfer it to a new tank to kick-start the cycle.
As always, a few more important notes about biological filtration:
Biological filters get better over time. “Cleaning” a biological filter makes it worse. You’re cleaning off the bacteria that do the work. Yes, they look like sludge (“biofilm” is what a bacterial sludge layer is termed by experts) but they are what makes this all work. Now, sometimes you do need to clean the biological filter because it’s jammed up and water doesn’t move through it but try to do two things. First, clean it in tank water, not chlorinated water. Remember, as far as aquatic organisms are concerned, chlorine is murder. Second, if at all possible clean only part of the filter so the bacteria from the other part can rapidly re-colonize the post-apocalyptic landscape of the cleaned filter. I like filters that have things like two different sponges in the biological filtration section so you can clean one and leave the other alone. (Admittedly, custom filtration is easy when you build your own filters.) I sometimes see people on fish forums say they think their tank has a fish disease when it has ammonia poisoning and so they clean everything really well to kill the germs. This just kills their fish faster.
Biological filters are alive. Things like fish medicines can kill parts of them. The wrong temperature or the wrong pH can kill them. If you have a filter go bad that can make a bad day a lethal day for a fish, so if things seem to be going crazy consider that maybe the first problem (temperature, pH, medicine) caused a filter problem.
The key to a biological filter is the conversion of ammonia to nitrite and nitrite to nitrate. You can buy a test kit for these chemicals at most fish supply stores. This can help you troubleshoot a lot. If, for instance, you see an ammonia spike but no nitrite or nitrate spike the biological filtration isn’t working because lots of ammonia should rapidly become lots of nitrite and so on. If you see a nitrate spike but the other numbers are staying low something bad may have happened but the biological filtration isn’t the problem. The day I wrote this I found a dead fish in a tank in lab. It had probably actually died the day before and been rotting the whole day. I had a bad nitrate spike but the biological filter (homemade out of two pieces of PVC and some high-grade filtration sponge from SwissTropicals) had converted a deadly ammonia spike into an unpleasant nitrate spike.
Change Your Water
All this filtration is great, but even with the best biological filtration in the world your nitrate levels will gradually creep up. There’s no way around that, and the very expensive devices you can buy to hold back the inevitable are not worth it. What is easy is to change the water regularly. Back when I first wrote this I aimed for changing 50% of the water every week. However, that has now changed to something more like 20% of the water per week. I sometimes don’t manage this, but I also test my tanks for ammonia, nitrite, and nitrate, and so I know exactly which tanks need water changes. Changing the water is simple: turn off the filter and heaters if they will get dry during this process. Dry filters tend to burn their motors out and dry heaters can sometimes explode. Remove 20% of the water (don’t remove all the water). Dechlorinate more water. Let it sit for a bit to get to room temperature. Add it into the tank. Turn the filter and heaters back on.
Bioload
Your tank plus your water changes plus your biological filtration define your maximum bioload. Bioload is the “load” your animals place on the system. Above a certain amount of living animal tissue5 in a tank (be it fish, shrimp, snails, or whatever) and the level of nitrates in the tank will get too high before you change the water. More water dilutes the nitrate, more biological filtration prevents ammonia from staying as ammonia, and more water changes gets rid of all the fish waste faster. I advise you (if you are a beginner) to under-load your tank.
Imagine that your tank can hold 2 pounds of live fish without going toxic. (I’ll discuss how to determine what load you can support in another article.) The temptation is to put 2 lbs of fish in it and have the tank look “alive” with lots of fish, or maybe a really large centerpiece fish. The problem with this it that you have no room for error. I mentioned earlier that I found a dead fish in a tank today. I probably missed that fish yesterday (it had been looking poorly two days ago and yesterday was crazy). That fish went from producing ammonia like a live fish to producing much, much more ammonia as it rotted. If I had that tank stocked at 100% bioload I would have gone over 100% and I probably would have killed all the fish in the tank. Instead, I have that tank understocked. I might be at 40-50% bioload. When a single zebra danio died in the tank that might have temporarily pushed me up closer to 100%, but it didn’t push me over. I did a big water change today and it’s all taken care of.
A lot of my lab tanks do not get optimal maintenance. I under-load them and I don’t ever have issues with them. Meanwhile, I know lots of fish hobbyists who always pack their tanks and have to stay on top of everything. It’s possible to do (I know people who do it) but if you want a casual, low maintenance fish tank avoid the temptation to cram it chock full of fish.
I Wish I’d Known That, But Now It’s an Emergency
So, what if you didn’t read any of this until after you put fish in your tank? You didn’t cycle the tank, you maybe don’t have any kind of filter, and now the fish are acting funny.
Get a filter. The right sort, which means one that has biological filtration (it may say this, or it may have a “biowheel”, or it may have sponges that water go through, or it may have media bags that look like broken pottery).
When in doubt, water change. Just make sure to dechlorinate.
If you need to use an emergency anti-ammonia product go ahead.
If you can get filter-gunk from someone with a working tank do it. This will kick-start your cycle.
Start testing the water, or getting it tested. What you want to see is the ammonia levels drop and the nitrate levels rise. Once your ammonia is getting converted into nitrates reliably you have a working biological filter and your tank is cycled. This can take a while, especially since you’ll need to be removing ammonia from the tank to keep the fish alive rather than leaving it in to feed the bacteria.
In the next article I’ll discuss choosing tanks, for those who haven’t already committed themselves.


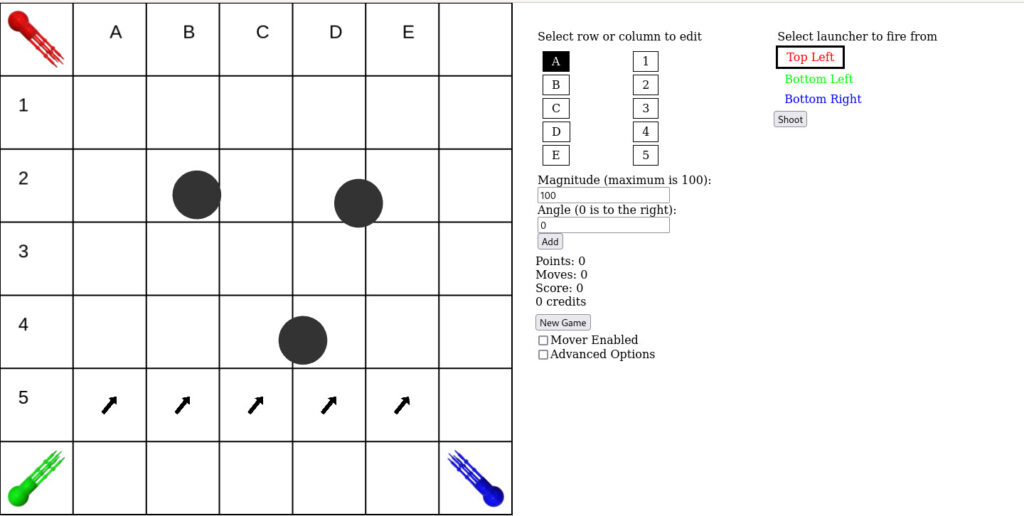
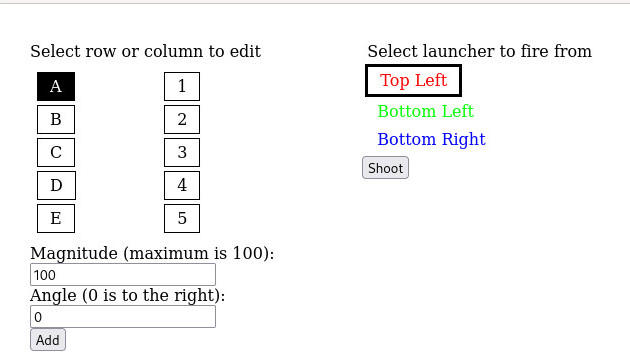
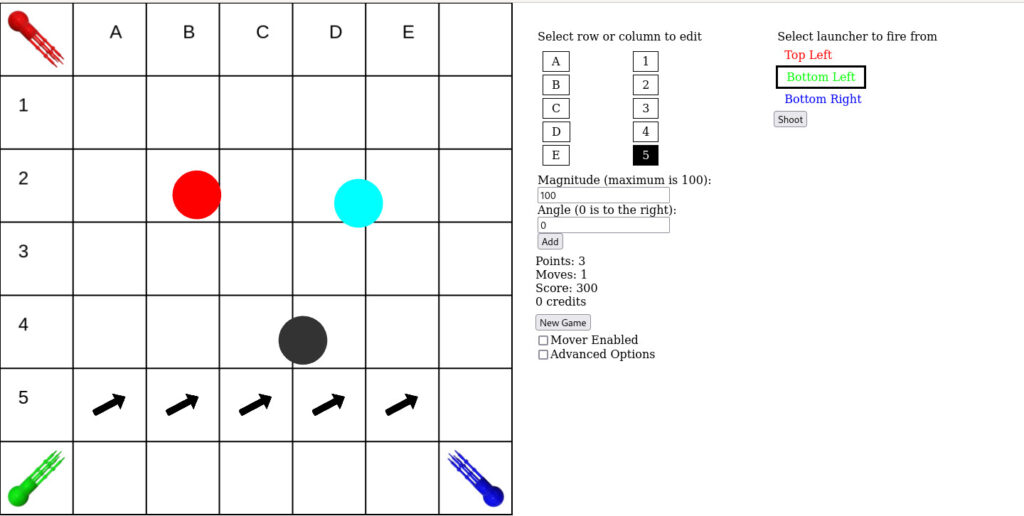
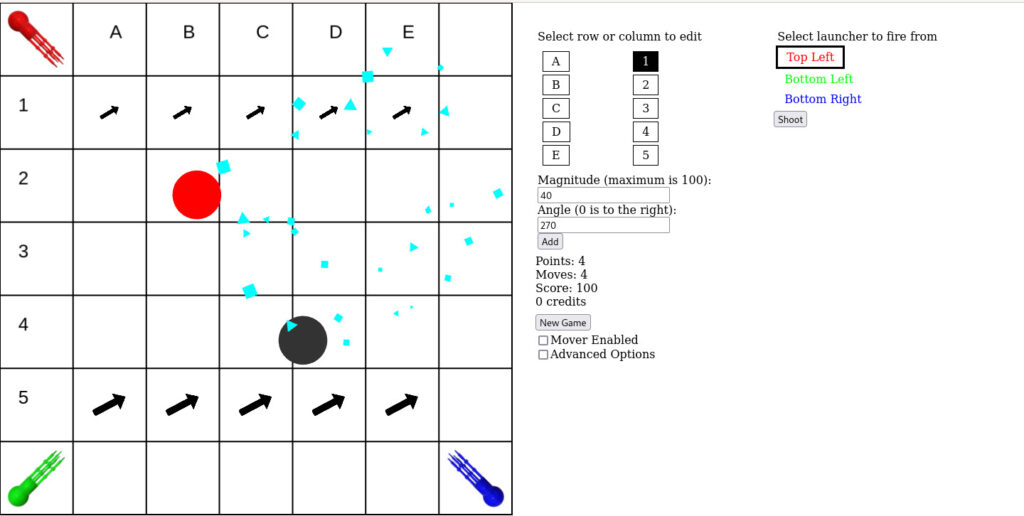
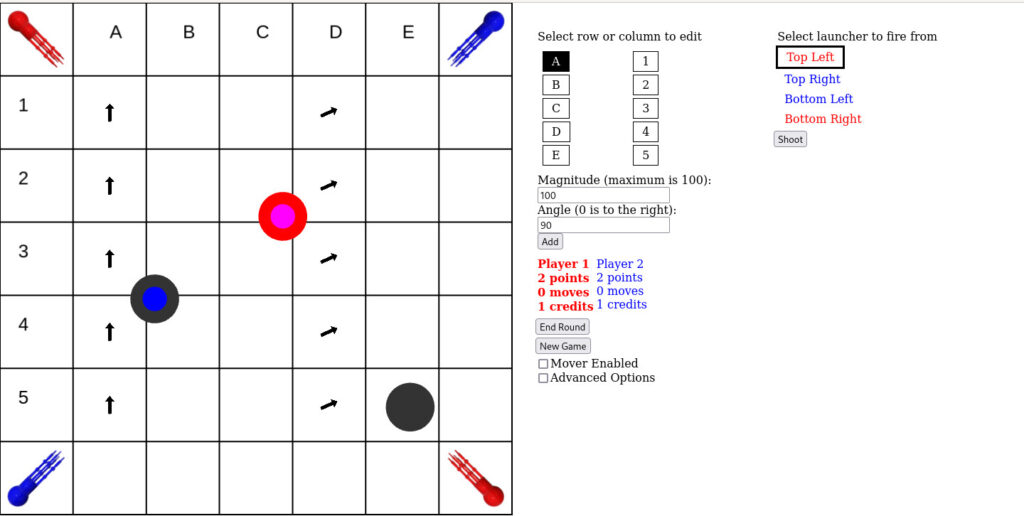

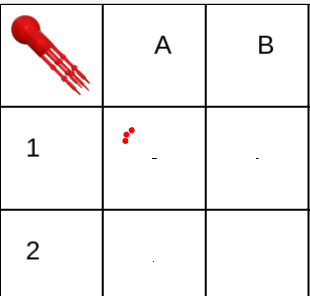
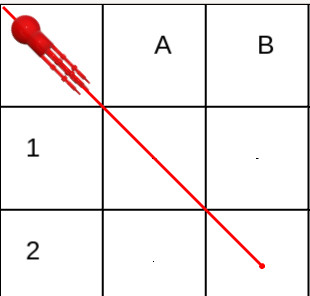
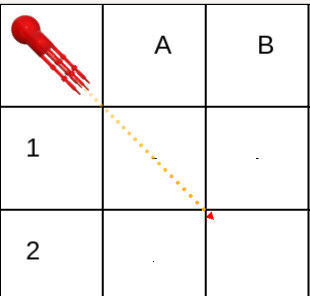

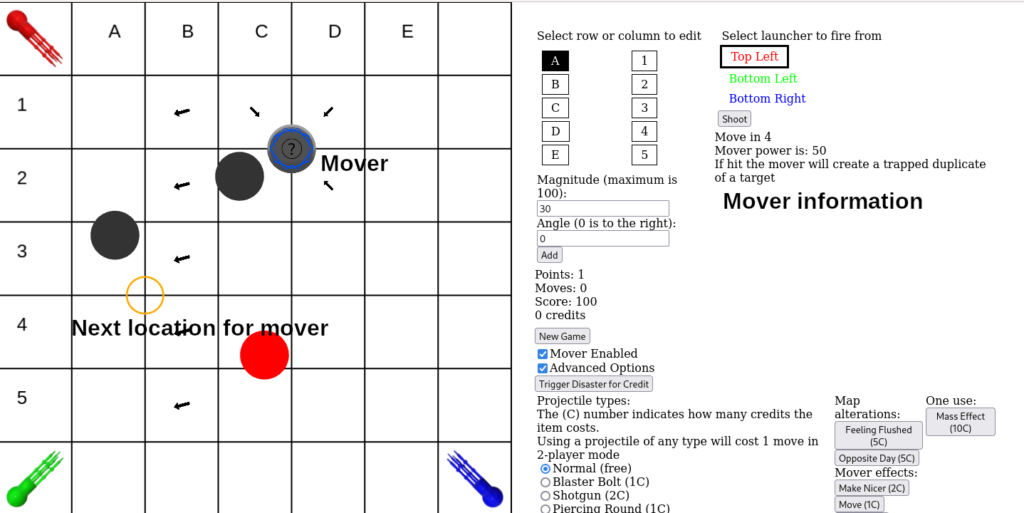
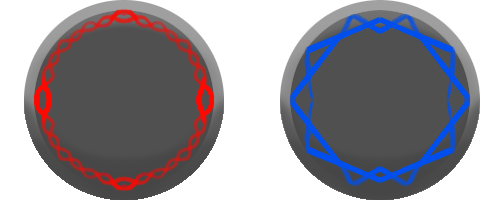


 When Color is Right involves the Stroop Effect. Instead of a colored block and colored text that says nothing useful the colored text is also the name of a color. When the name of the color and the color of the text match (e.g., the word “Green” in green) the user should click. Honestly, this one drove me nuts every time I tested it.


