VectorGrid Guide

VectorGrid is, fundamentally, a puzzle game. There are three targets on the screen which need to be hit by a projectile from each of three launchers, but aiming the projectiles can only be done by steering them using rows of pushers applied to entire rows and columns.

VectorGrid also has several levels of complexity. I recommend that you start playing VectorGrid in single-player mode without either advanced options or the mover enabled. Once you feel good about the basic game, switch on the advanced options. When this gets predictable, enable the mover.

Quick Start

You’re playing single-player, no fancy options. You just want to start. What do you do?

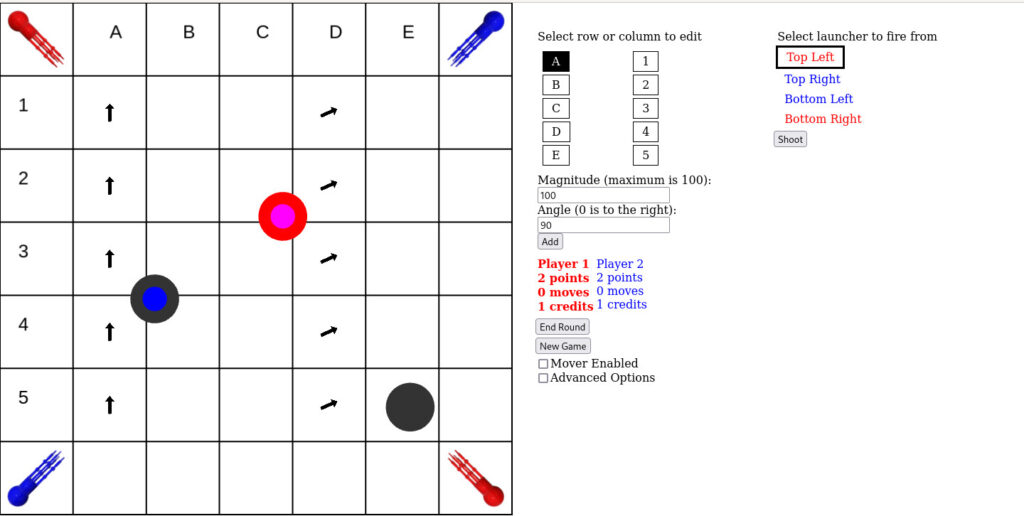
The board will look like this:

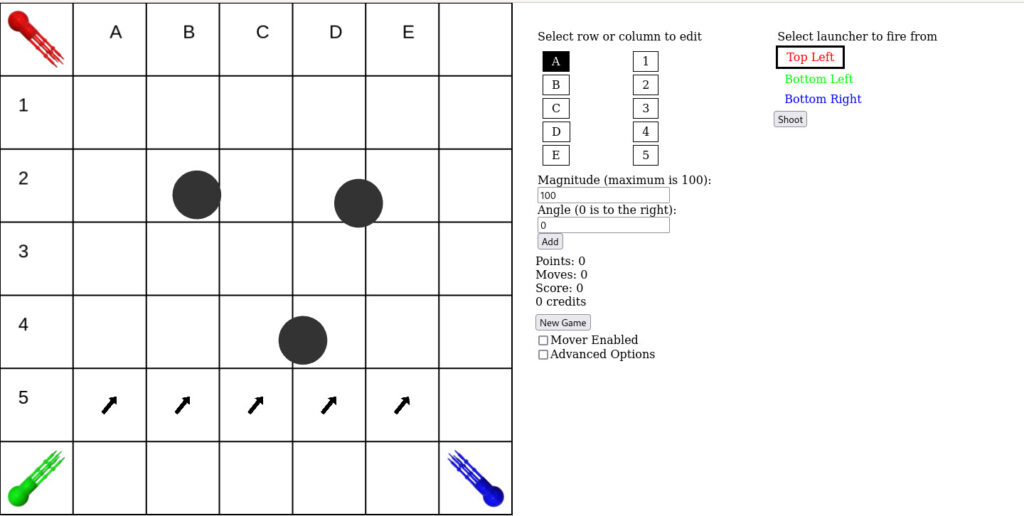
On the left is the playing grid. Three targets (dark circles) are present, and three launchers (red, green, and blue) in the corners. In this diagram, a row of pushers is located in row 5, pointing up at about 45 degrees.

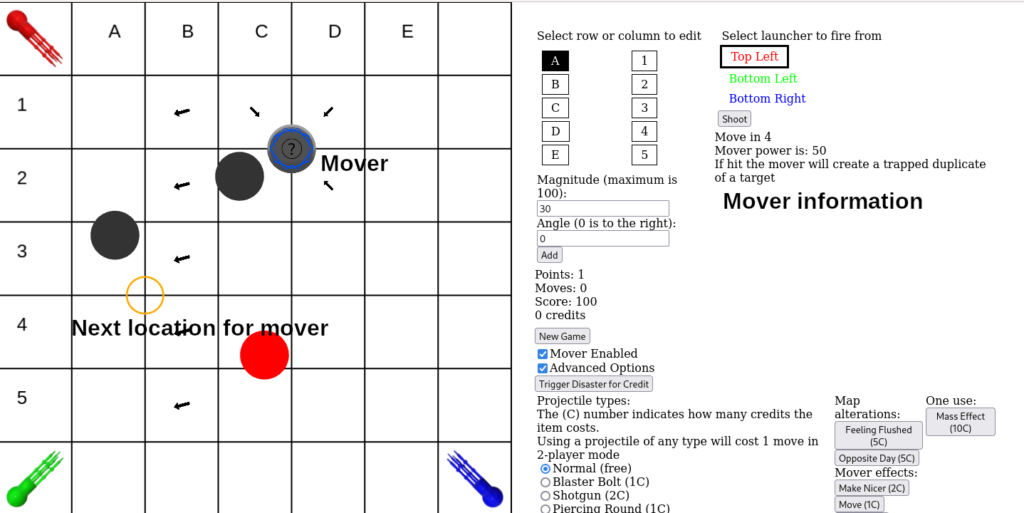
On the right is the control panel. For a quick start we want to focus on the top section of the control panel, shown below.

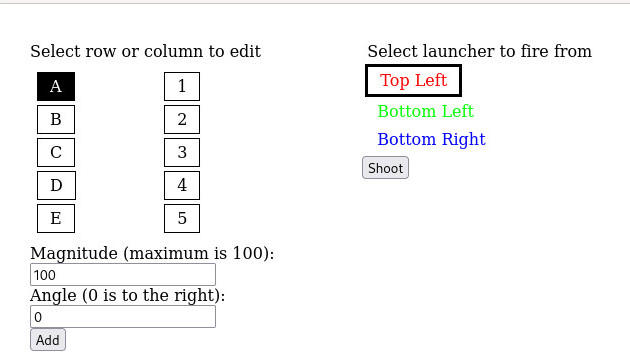
On the right is the launcher control section. Currently, the red launcher (top left) is selected. Clicking “Shoot” will shoot a projectile from this launcher. I strongly recommend beginning any single-player game by shooting a shot from every projectile to see where it goes.

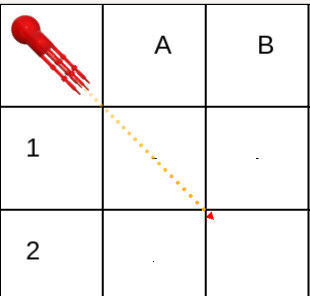
On the left is the pusher control panel. Currently, we are ready to add a column of pushers aimed to the right (0 degrees, degrees are added counter-clockwise, and negative degrees are accepted as valid input) at full strength (100) in column A. Pushers can ONLY be added to an entire row or column, which is where the puzzle nature of the game comes into play, because fixing the projectile path for one launcher may interfere with another.

Without any interference, all the launchers will simply fire straight through the middle of the board. To hit targets that are not in the initial line of fire you will need to add pushers to deflect the projectiles. A pusher pushes anything in its entire square, not just on its arrow icon, and continues to push as long as the projectile is in the square.

The goal is to hit every target with a shot from every launcher. Once hit, a target changes color to indicate what it has been hit by.

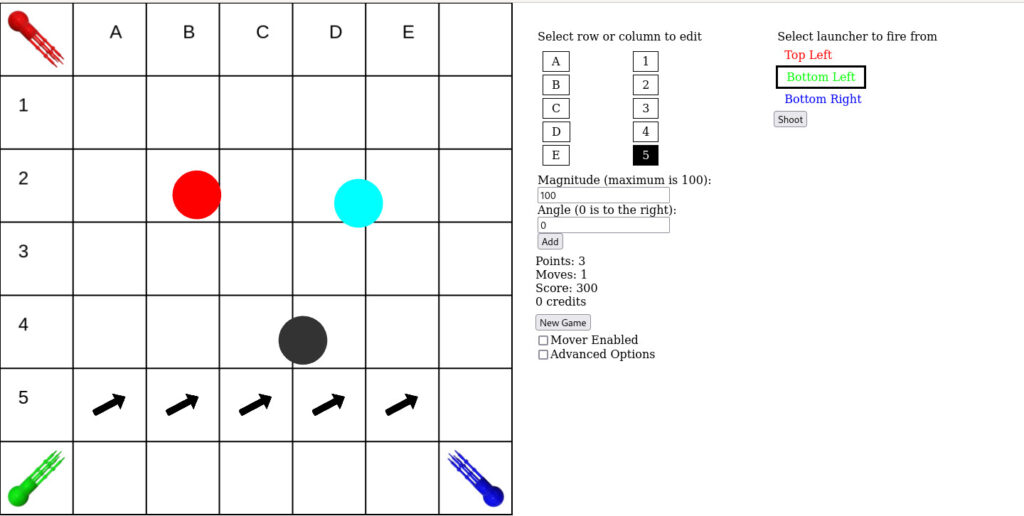
In the image above the upper left target has been hit by the red launcher and the upper right target has been hit by the blue and green launchers (turning it cyan, both blue and green). Hitting this target with the red launcher will explode it. Exploding all three targets with as few pusher-adds as possible is the goal.

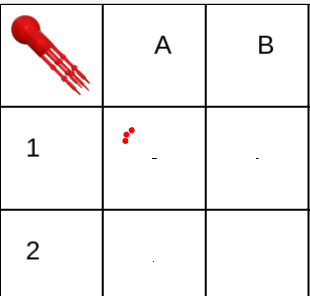
Currently, the red launcher fires down the middle of the board, to the left of the intended target. (Hitting the red target again from the red launcher accomplishes nothing.) To deflect a projectile into the target we need to push the projectile right, and to push it hard right we should probably also push it slightly up, slowing it as it crosses the pushers, giving them more time to push it right.

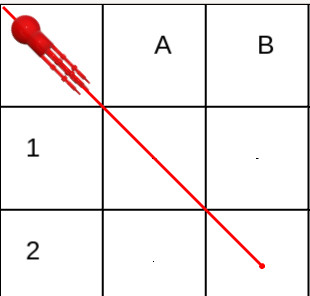
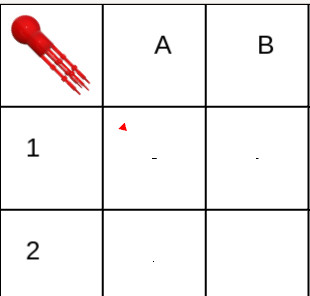
The image below shows a successful shot.

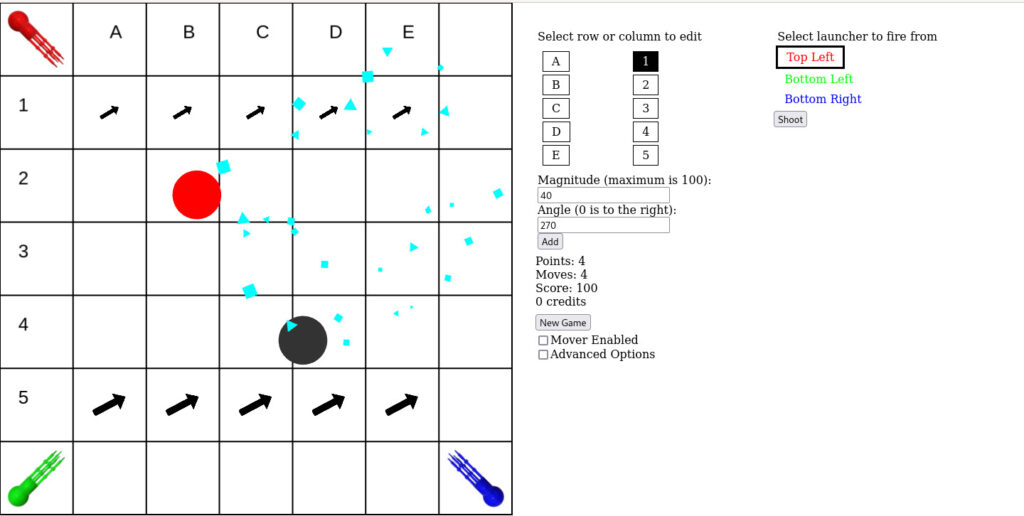
You can see a row of pushers in row 1 that are aimed mostly right but slight up. If you examine the control panel, however, you will see that the last row I added was row 1, aimed down, at 40% power. Why? Well, my initial pusher row, 100% at 45 degrees, actually stopped the projectile’s downwards motion and then tossed it up and off the board, so I used a weaker downward pusher to reduce the strength of the original pushers. Pushers always add together, using basic vector addition rules.

And that’s what you need to know to start!

What About Two-Player?

Assuming you’ve read the single-player quick start two player has only two more rules. First, there are rounds that players alternate between. Most rounds have two moves (a move is either shooting or adding a vector) but the first one only allows a single vector add (otherwise player one has too great an advantage). In the image below you can see in the control panel that it is Player 1’s turn (Player 1’s information is in bold), which color each player controls, and that Player 1 is out of moves. Player 1 should click “End Round” to pass control to Player 2.

Second, each player now controls two launchers of the same color, and it’s no longer necessary to hit a target from both launchers. Instead, a target will explode from any three shots from the same player. Each time a player hits a target they get a point. If you can explode the target before your opponent gets hits on it you can deny them points.

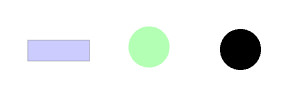
In the image above you can see how the color-coding works. Targets are colored from the inside out. The leftmost target has been hit once by a blue projectile. If it were hit again it would turn solid blue. If it were hit a third time it would explode. The topmost target has been hit twice by red projectiles, and once by blue, making it red all the way through, but red + blue (magenta) in the middle.

Advanced Options

Advanced options make use of credits. How do you get credits?
Single Player
1) Hit the new “Trigger Disaster for Credit” button. Something bad will happen and you’ll get credits. The worse the disaster is the more credits you will get.
2) Explode a credit mine. These blue mines with a dollar sign on them explode whenever a projectile gets close. They are dropped randomly on the board when a target explodes.


Two Player
1) Skip a move for a credit.
2) Hit a target.

There are now several new projectile options available. Each of these has a credit cost written as (number C) after the projectile name. In single player mode rockets are free until you add special warheads, but in two player mode all rockets have a cost.

Shotgun

The shotgun throws a cluster of three projectiles at one time, at slightly randomized angles. This can be useful for hitting a target that is slightly off the main path. In two-player it can potentially one-shot a target

Shotgun in action.

Blaster Bolt

The blaster bolt fires a laser-like bolt that moves straight through the first square and a half without any deflection before becoming an ordinary projectile with the velocity a projectile would normally acquire from the launcher. This can be used to avoid unfortunate pushers in the first square.

Blaster bolt.

Piercing Round

Piercing rounds are like normal shots except that they are triangles and they do not stop when they hit a target. This means that if two targets are in a line they can both be hit with one round.

Item Deployer

Item deployers are rounds that explode when you click “Detonate” (which replaces “Shoot”) and drop an item where they are. Items can be found under “Warhead Options” and are the entries other than double power and shrapnel. Items are described further below the Rockets section.

Rockets
Rockets propel themselves forward, constantly accelerating in their original direction of travel. This makes them hard to deflect, which can be both good and bad. They also explode when they get into proximity of the target. You can also explode them yourself by hitting the “Shoot” button again, which will become a “Detonate” button once you launch a rocket. This is not very useful for a normal rocket, but once a rocket is loaded with a special warhead this can be very useful. Most of the special options only apply to special warheads, but the Double Power option applies to regular, explosive warheads and doubles the size of the explosion.

Rocket being fired from the red launcher. Rockets blast flame from behind themselves to indicate the direction of acceleration.

Special warheads include the shrapnel warhead and a variety of trap warheads. Shrapnel warheads spray projectiles when they explode, effectively a rocket that triggers Shotgun when it explodes (although the angles of the projectiles are more extreme in Shrapnel, and their number can be increased with Double Power).

Traps/Items

Traps in VectorGrid refer to any stationary map element that interferes with projectiles. Most traps go away after a certain number of moves (the number depends on how they were triggered) but mines stay on the board until they explode (which throws regular projectiles off course and detonates rockets). Mines are also not something you can use as a projectile, and will only appear as part of disasters on the board. Projectiles armed with traps can be detonated to lay the trap, and the trap will stick around longer if Double Trap Time is applied. Traps can also be cleared with the Trap Clear warhead, which has a large explosion that both damages targets and removes traps.

From left to right: a horizontal reflector, a rabbit patch, and a hole
A mine, which cannot be deployed by the player.

Reflectors

Reflectors are what they sound like. They are blueish squares that bounce projectiles off of themselves. They are larger in one direction than the other, and you can select whether they will be longer horizontally or longer vertically.

Rabbit Patch

The Rabbit Patch option applies a speed doubler. These are translucent green circles that double the velocity of any projectile that crosses them. Want a double-power launcher? Explode a Rabbit Patch rocket right off the end of the launcher.

Blow a Hole in the World

Holes are only available as a rocket round in two player mode, because they serve only to make a mess. They make a hole in the board that any projectile will fall through, never to be seen again.

Non-projectiles
There are also a set of buttons that have credit costs that can be used. These do NOT count as moves in two-player, and so a player can apply one while also using two moves. The ones marked “One Use” can only be used once per game.

Feeling Flushed applies a giant whirlpool/toilet bowl effect to the whole board. You pick the direction. This adds to the existing pushers, so don’t expect it to override some strength 800 monstrosity you’ve saddled yourself with.

Opposite Day temporarily flips the sign of all existing pushers on the board. This can be useful but is often very disconcerting when the effects wear off, especially because all pushers put down while Opposite Day was in effect stay aimed in their original direction.

Two player games can also make use of Mirage. Mirage is cheap because it’s more mean than it is useful, although under certain circumstances it’s clearly useful. It clones an existing target and loads the clone with traps. Half the time the “new” target that appears is the clone, but half the time the clone takes the place of the old target and the “new” target is the old one in a new place.

Mass Effect adds a slight “gravitational” effect, where all targets end up with weak pushers aimed at them.

The Mover

The Mover is a problem. And it moves, of course. Because this is not a game of speed and reflexes it moves based on your own moves. It displays its own information just under the “Shoot” button. Adding pushers reduces its counter by 2, shooting reduces it by 1. Once the counter reaches zero the Mover (a gray circle about the size of a target, with red or blue outline detailing and an image in the middle) teleports itself to the marker (the orange circle). A new marker appears, and so the Mover is, in this sense, entirely predictable.

The mover, sitting at the intersections of 1, 2 and C, D, is a pull-type mover, warping the squares it touches to pull projectiles towards itself. It will teleport to the intersection of 3, 4 and A, B when it moves.

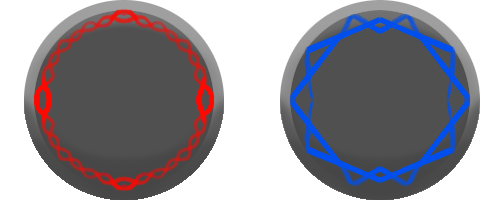
Movers have two effects. One is their ability to “warp” the map. Push-type movers create pushers in each of the four squares they touch that point away from them, while pull-type create pushers pointing towards themselves. These pushers are not permanently attached to these squares. When the mover moves the pushers also vanish and appear at the new location. Push-type movers have a red design around the outside and pull-type have a blue design.

A push-type mover on the left and a pull-type on the right. Movers will also always have an image inside of the red or blue circle, not shown here.

The Mover’s second effect is its effect when it is shot. It blocks shots, which can be annoying by itself, but it also always has some effect when hit. This effect is listed in the mover information. In the image of a game with a mover above the mover will create a trapped duplicate target when hit. This is also shown by a unique icon on the mover, so after some time you can recognize a mover’s effect by its image.

Top row, left to right: the mover will move when it is hit, the mover will throw a shield of mines around itself when hit, the mover will permanently reduce its countdown between moves by one, and the mover will become nicer.
Bottom row, left to right: the mover will repair a random target, the mover will throw random unpleasant traps, the mover will add a random row or column of pushers, and the mover will shoot out credit mines.

Some mover functions are good (like ones that produce credit mines). Some are neutral, like the ones that change how often the mover moves. Others are bad, like the ones that repair targets or drop traps. However, every time the mover is hit or moves it changes its effect. For this reason it is a bad idea to fire at the mover multiple times because you see a good effect. The first projectile will hit it, getting the good effect, and the following projectiles will trigger random effects as the effects change!

Basic Mover Effects

Attitude changes

You may see effects called “make mover nicer” or “make mover meaner”. The “attitude” of the mover is its odds of generating good, neutral, or bad effects. At higher difficulties the mover starts meaner. Attitude changes add together.

Repair

If the mover repairs a target the target acts as if it was hit one less time. Which launcher it removes the hit from is random, so this can be a real issue. However, you do keep the point for hitting the target, so as long as you can still repeat the shot you may be able to get a higher score this way.

Move faster/slower

The mover may move as soon as it is hit, or add five to its countdown when hit. These are once-off effects. It may also alter its basic countdown. Movers start by counting down from five before moving. However, on-hit effects may permanently add or subtract from this number.

Power

A mover’s power is the magnitude of the pushers it create. You will see options to both increase (double) or decrease (halve) that power. These stack together.

Add pushers

The mover can also add a random row or column of randomly powered and randomly aimed pushers.

Mirage

The mover can duplicate the mirage effect.

Death

The mover can be made to vanish if you hit it when it has this effect. However, in its death it will take a terrible vengeance on the board.

Throw/Shoot/Shield

The mover can also deploy any trap as well as credit mines. The method of deployment can be throw, shoot, or shield. Throw is symbolized as slightly-arcing lines in the icon. The mover creates fragments with random vectors and timers. These move across the map being pushed by pushers until their timer runs out and then they drop their items.

Shoot is symbolized by straight lines. The move blasts out several lines which place items where they end. They are completely unaffected by pushers.

Shield is symbolized by a circle of lines radiating out from the center. This is exactly how a mover creates a shield: eight lines like those in shoot appear, even spaced around the mover, and drop items at a set (close) distance.

Introducing ReactionTimer

ReactionTimer, released today (although in secret beta on this site for several months), is exactly what it sounds like: a reaction timer. However, it also provides a number of challenges that are designed to time your reaction time plus the time required to perform some mental task. This program is deliberately smartphone-friendly.

Basic usage consists of these steps:

  1. Select a challenge from the list of yellow options. (Your current selection will be white text on a black background.)
  2. Click “Start Challenge”. You will have a brief window of time to move your cursor/finger over the large button that says “Click on go”.
  3. The the dots (…) above “Click on go” will change and some sort of signal will appear.
  4. If the signal is correct click “Click on go”. Otherwise wait for the correct signal.
  5. Once you click (correctly) your time will appear and will be logged on the screen below the buttons.

The image above shows a screenshot of the program as it might appear on a smartphone1. The tail end of the list of challenge options can be seen at the top, followed by a black-bordered block containing the instructions for this challenge type. Below this is the word “GO!”, the signal for this challenge, and under “Start trial” is my time for this challenge. Below “Click on go” is a chronologically-ordered list of my times, with the most recent at the bottom.

In this case we can also see the use of ReactionTimer. The change from “Countdown” to “RandomGo” has added 189 milliseconds to my reaction time. By trying different challenges one can actually measure the time required to mentally process the signal.

Challenge Options

Countdown is the simplest challenge. After a brief moment to allow the user to prepare the screen shows a countdown –  3, 2, 1, GO!. The timing is the same at each transition which allows the user to click “Click on go” when “GO!” should be appearing and not actually wait for the signal to be processed by the brain.

Random Start is perhaps the best measure of actual reaction time. The signal area remains as the starting three dots (…) until, at random, it changes to the word “GO!”. The signal is clear and unambiguous, the only challenge is waiting for the visual processing of the signal.

When Word is Go draws randomly from a list of words. These are all sorts of words, but all are capitalized only on the first letter, except for “GO!”. The transitions between words occur at regular intervals, but the user must still identify what the word is.

When Word is Go (Annoying) also uses a random list of words, but unlike normal When Word is Go all of the words are two letters, capitalized, and followed by an exclamation mark. This makes them less visually distinct from “GO!”.

When Word is Animal lists random words, some of which are the names of animals. If the random word is the name of an animal the user should tap “Click on go”. Unlike the previous challenges this challenge incorporates multiple correct answers, which makes it noticeably harder, as the user’s brain has to process what the word is, not just whether it is or isn’t one specific word.

When Word is Not Animal is the opposite of When Word is Animal. Is it harder to parse a negative than a positive? Now you can see!

When Word is Adjective lists random words, and the go-signal is when the word is an adjective. Care has been taken to supply the list only with words that are clearly adjectives or clearly not. However, this one requires a great deal more mental processing than the previous ones.

When Addition Problem is Right supplies the user with a simple addition problem (two numbers, both under 10, and their sum). Most of the time the sum is not correct. (Under the hood ReactionTimer adds up the numbers correctly and then normally adds or subtracts a small, non-zero, random number.) When the numbers actually add to the displayed sum the user should click. This one gives the user more time between transitions than the previous ones.

When Colors Match presents the user with a colored square and the colored word “Text” (see below). When the colors of both items are the same the user should click. This one largely lays the groundwork for later challenges involving color and allows the user to get a baseline reading for recognizing color matches.

When Color is Right involves the Stroop Effect. Instead of a colored block and colored text that says nothing useful the colored text is also the name of a color. When the name of the color and the color of the text match (e.g., the word “Green” in green) the user should click. Honestly, this one drove me nuts every time I tested it.

When List Ascending presents the user with a list of four numbers (e.g., 8, 10, 21, 31). If the list is ordered so that each number is larger than the number to its left the user should click. (So, for instance, the user should click if presented with my example list, but not if it had read 10, 8, 21, 31.) This forces the user to make multiple evaluations (three, specifically) to solve the problem.

When Word is Not Animal + Color Match combines two previous challenges. This is meant to allow a user to see if evaluating two different challenges is harder than evaluating just one, and if the difficulty is additive. This one can be used alongside When List Ascending to see the difference between the same evaluation multiple times (“is this number larger than the one on its left?”) and multiple types of evaluations. In this case, in case this is unclear, a colored square and some text will appear as in When Colors Match. However, unlike When Colors Match the text will be a word. When this word is not the name of an animal and is also the same color as the colored square then the user should click.

All of these challenges together are meant to allow a user to evaluate the time required to perform a whole suite of mental tasks as well as to evaluate how combining tasks affects processing time. There are definitely other options that could be added, although this set seemed to me to capture most of the main comparisons I was interested in. However, I welcome feedback if there are additional challenges that could be added to capture new dimensions of mental processing.

RapidModel is Here

RapidModel is one of the original in-browser programs. This may be an odd thing to say since it’s only just appearing now, as the fourth project (or fifth, or sixth, depending on how you count the projects in beta) but it’s actually the second in-browser program I wrote. Much like the original version of CamoEvolve it needed some serious fixes. Unlike CamoEvolve it needed so many fixes that it really wasn’t workable, and so I took it down, re-wrote the code effectively from scratch (I kept a few drawing functions), and have now put it back up (having, in the meantime, re-written the whole site).

RapidModel is based on something I did in college. In one of our classes (probably Conservation Biology) we played around with a program where we could link items together and then play with sliders on them and see how they affected other items. I assume we built population models with this system, but I don’t really remember. RapidModel is similarly generic (but also free and does not require downloading).

At its most basic, RapidModel is a bunch of nodes that hold numbers with connections that cause the numbers in one node to influence the numbers in other nodes. The numbers in a node may represent anything – number of caribou, GDP, cans of beets – and the connections can take almost any form. So, without further ado, a brief explanation of the objects in RapidModel.

Nodes

Nodes are just number containers. To create a node select Add/Edit Nodes and click on the black part of the screen. A new node will appear where you click and you’ll be asked to name the node. You’ll also be asked for:

Number: The number the node starts with. When you hit “Reset” the node will remember this number and reset to it as well.

Maximum: The number in the node will not exceed this number. In some cases the maximum is based on a real world constraint and in others it exists just to keep the model in some sane range.

Minimum: The number in the node will not drop below this number. For many real objects zero is a natural choice.

If you edit a node (which you do by selecting the radio button with the node’s name after creating a node) you can also choose to check Round to Integer. In this case the node will never display non-integer numbers. However, it does keep track of non-integer effects. So, for instance, if an integer node held a 2 and you subtracted 0.1 from it ten times in a round the node would drop to 1. If you subtracted 0.1 from it once a round nothing would happen for ten rounds, and then it would drop to 0. For many real-world items rounding to integers makes sense. There are no 0.3 whales or 0.71 consumers out there.

Connections

Connections can only be created in the sidebar. Create some nodes, selected Add/Edit Connections, and select Add New. Connections name themselves in a way that describes exactly what they do (for instance, a recent model of mine had a connection called “Seals-Sharks”) so you won’t be asked for a name but you will be asked for a start node and an end node. Circular connectors are fine. Calculators (which we’ll discuss next) can only be starting nodes. Here’s the important thing to remember: start nodes do something to end nodes. This is easy to think about with additive nodes. You take the number from the start node, go over to the end node, and add that start node number to the end node. What a start node does to the end node is determined by the node type, which is just a mathematical operator. Connection weights can be used modify how much of the start node is used to modify the end node. For instance, to grow a node by 50% a turn connect a node to itself with an additive connection of weight 0.5. You could do exactly the same thing by setting up a node that just held the number 1.5 and using it as the start node for a multiplicative connector of weight 1.

Calculators

You create calculators much like nodes, which calculators are (technically) a subclass of. However, unlike nodes the important things that go on in calculators have to be done from the sidebar menu. Calculators have a set of arguments with exactly the same name as in nodes and these arguments (maximum, etc) function exactly the same way so I won’t re-describe them.

However, while calculators are programatically nodes they are ideologically very fancy connections. Unlike nodes they don’t retain a number for multiple turns, modifying it. Instead they calculate a value fresh every turn. Originally this was done by using dozens of connections and dummy nodes but calculators work much better. It’s the addition of calculators that made RapidModel usable. To use a calculator you must give it an equation. Equations can contains the names of nodes, numbers, and a small set of mathematical operators. Equations are written in a pretty straightforward manner: Squirrels/Trees gives you the number of squirrels per tree this turn. If you type an equation correctly you will see “No errors” when you hit enter. Otherwise you’ll be told what part of the equation was an issue. Calculators will also identify nodes that they draw numbers from and create yellow connections to them automatically.

The equation reader can only handle the following operators: +, -, * (multiplication), / (division), ^ (exponentials). It cannot handle order of operations. All equations are read left to right. So Squirrels/Trees/10+1 is equivalent to ((Squirrels/Trees)/10)+1.

Calculators can also be used to delay effects in a model. The delay time simply puts the calculator X turns behind the rest of the model. At the very simplest a calculator could simply take the value from another node a hold it for a certain number of turns (for instance, price responds to the demand of two turns ago). Because of the delay function the initial number of the calculator can be important. Perhaps you are multiplying by the output of a delayed calculator. If you start with 0 in the calculator you’ll zero out your next node as well, whereas if you started with 1 in the calculator nothing would happen for the turns before the calculator showed its first calculation.

So what does this look like?

Here’s a silly example. I want trees to grow slowly. I also want the squirrel population to grow but to be capped at 2 squirrels per tree. I made this model.

Trees and Squirrels are just nodes, set to round to integers. SquirrelsPerTree is a calculator with the equation Squirrels/2/Trees, which hits 1 when there are two squirrels per tree and stays under 1 when there are less than two squirrels per tree (as in this screenshot). Trees connects to trees with an additive connector of strength 0.1 which causes the population to grow by 10% per turn. (Again, while trees are integers, the accumulation of partial trees still eventually triggers the addition of a tree.) SquirrelsPerTree creates dummy connections (in yellow) that can’t be edited but which show that it uses both Trees and Squirrels for its calculations. Squirrels is divided by SquirrelsPerTree, so when there is extra space around the population expands. The minimum cap on SquirrelsPerTree can be used to lock the squirrel growth rate at some maximum and the maximum cap can be used to prevent the squirrel population from crashing violently.

I have no idea what you’ll use RapidModel for. I’ll definitely use it for population models in ecology this semester, but I deliberately made it extremely open-ended. If you do something fun with it leave me a comment.

CamoEvolve 1.1 is Here

CamoEvolve 1.1 has just been uploaded to the main site. Since I haven’t actually discussed the purpose of CamoEvolve here before I’ll cover both the changes in 1.1 and also the basic idea of the program.

CamoEvolve is an evolutionary simulator designed to run in a small window, making it suitable for tablets and phones (although it continues not to work on iOS touch-enabled devices for reasons that are unclear to me). In it there are objects that have a color, a shape, and a size. Some of these objects are background objects and some are critters hiding from you. The background objects are all generated from the same template and so they tend to be similar in color, shape, and size. The critters maintain there own gene lines and inherit their color, shape, and size (with mutations) from the critters who survive.

Your task is to identify the critters and kill them by clicking on them. For a real-world biological parallel imagine being a bird trying to find camouflaged insects amongst rocks and twigs. Like this hypothetical bird who grabs a stick and has to spit it out you will suffer a penalty for clicking on the wrong thing and will be temporarily unable to kill critters.

A full help file is available and so I want to talk here a little bit about why I wrote CamoEvolve, what I’ve added in Version 1.1, and what you might do with the program.

The aim of CamoEvolve is to model natural selection in a manner that is very basic (no frills to confuse anyone), game-like, easy to interpret, and usable on almost any device. It’s meant to be an easy-to-use teaching tool where students can see natural selection first-hand. I attempted to accomplish each of these goals as follows:

  1. Basic: All objects in the game world have the same properties, of which there are only three, and the only possible actions are to click on things (killing them if they are critters). Critters can’t do anything at all. They live or die based entirely on the player’s actions and the inherent time limit the player is working against.
  2. Game-like: This is the part I think works best. It can be genuinely hard to find the critters (although one gets much, much better with practice). Instead of telling students to try and pretend to select for certain traits you are actually trying to do something that is genuinely challenging, and there’s a fairly harsh scoring system to keep you on your toes.
  3. Easy to interpret: You know when you start having trouble finding critters. You can also see all the elements in the game.
  4. Usable on almost any device: While many of my simulators have a graphics area and a control area CamoEvolve is deliberately built around a single area that is graphics and controls and is made so simple that it can be played on pretty much any reasonable screen size. I was specifically targeting phones here since all my students seem to have them and it’s much easier to say, “Take out your phone,” than to march everyone to a computer lab. However, as noted, there are some crippling issues on iPhones and iPads.

Changes

So what did I change? Well, I ran across two issues in CamoEvolve 1.0. The first was that rendering all of the objects and moving them steadily down the screen took more processing power than many phones seemed to be able to spare. Given my phone-compatibility goal that wasn’t very good and so the first change is that the scrolling-background mode is only one option, and not the default one. Instead, the default mode presents a screen of objects for a set time and then switches to a new scene. To accommodate this change I’ve tweaked the “lockout time” used in this mode, so you may notice that on the same screen the amount of time you are “jammed up” after a mis-click varies between modes. Also, you cannot get locked-out right after the scene changes. In my early testing I kept clicking on a critter as the scene changed meaning that I mis-clicked, got locked-out, and then couldn’t click anything. Now there is a small grace period as the scene changes. Also, of course, critters have a win condition where they are counted as surviving if they live to the scene change, rather than if they make it past the bottom of the screen.

This seems to have reduced the processor burden sufficiently, and this mode seems to work well on phones.

The second change is a simple one. In early usage students were sometimes unclear as to what was going on because it was easy to lose sight of the critters very rapidly as selection pressure made them better camouflaged. There is now a no-background mode to allow you to see how killing off some critters changes the gene pool.

To implement these mode options there is a new button on the main screen, Settings, that allows you to access these options.

What would you do with CamoEvolve?

Simply playing CamoEvolve demonstrates natural selection. A short explanation of how it works (critters that live have children like, but not identical to, them) seems enough to get students off on the right foot and then being able to play around with the game makes the concept clearer.

CamoEvolve also demonstrates genetic drift. If a player stops playing but lets the game run the critters become bizarre and mismatched. Since the critters are asexual each gene-line develops in its own way, and this way is random without a selective agent. I’ve had students switch between playing and not several times to see how a selective pressure steers a random process.

Artificial selection and natural selection are closely tied conceptually. The no-background mode makes it much easier to practice artificial selection. I generally set a random target for the students (red triangles is my go-to, unless someone actually starts with anything like that) and have them compete to get there first.

What would I do with 100 Places?

Having publicized the existence of my in-browser software I’m beginning to get questions. One of the more frequent ones is “What do I do in/with 100 Places?” 100 Places is designed to teach about niches and niche partitioning in ecology. It’s also designed to simplify this a lot so the only way to make organisms different is by choosing how they allocate their energy. All organisms use the same resource (space) and get the same amount of energy per turn (100). Only the allocation of energy (and some human-friendly things like names and colors) can differ between species. So here are some basic things you can do with it:

  1. Demonstrate competitive exclusion. This is simple. I’m going to make four identical species, differing only in color and name. Since I want this to go quickly I’ll up their ability to survive in harsh squares (allowing them to populate the whole board lets runaway ecological dominance runaway properly) and steal that energy from their ability to resist herbivores and disruptive events. See below, complete with totally awesome species names1.So what happens when we start the simulation running? Well, the board almost immediately fills. However, WeaselBait loses out in the mad scramble, and ends up with less individuals than the others.The graph is extremely choppy at this point, since nothing has any resistance to the herbivores wandering through and the disruptive events (let’s call them storms) and so large open patches are constantly appearing and then being filled. But by the mid-200 turns Kataklysm has (somewhat ironically) lucked out and has a commanding population lead. Somewhere around turn 600 Harmaggeddon shuffles off this mortal coil. At this point Kataklysm has a population of 79 (remember, 100 is the maximum population of everything put together) and so any open spot immediately gets spammed by Kataklysm seeds. By turn 750 PoofyPants is gone, too, and only Katakylsm and WeaselBait (which, ironically, looked worst-off at the beginning) are left. Around turn 900 it’s all over – nothing is left but Kataklysm, which is presumably high-fiving its teammates and yelling, “COMPETITIVELY EXCLUDED!” at the other species.
    This example is a particular sort of competitive exclusion in that the winner is random because all species are identical. However, it demonstrates the idea very clearly. Even though all the species function exactly the same and so there is no “best” species2 there is still only one survivor.
    Obviously, one other thing you could do with this is play with the environment and organisms to see under what conditions/what kind of organisms does the resolution of the scenario (i.e., the extinction of three species) take longer. Does apparent coexistence last longer in some scenarios? Probably. I have a suspicion that I should have turned down the rate of disruptions to make things resolve quicker in my example.
  2. Can you make an organism that can push the generalist that is auto-created at the beginning of the simulator into extinction every time? This is also competitive exclusion but of a different sort since here there is a “best” species. This should also be easy since the generalist is literally just allocating the same amount of energy to every task. Some tasks are probably not worth that energy and so it shouldn’t be hard to design an organism that takes energy from these tasks and puts it somewhere more useful.
  3. 100 Places is named 100 Places because there are only 100 Places and places are the only resource the simulated organisms (I think of them as plants) need. How many species can you get into stable coexistence in just 100 places?
  4. Habitat variation should make it easier for more species to exist stably. The default habitat has a harshness range of 0-50. If you up the range to 0-100 can you cram in a few extra species and keep it stable? If you drop the range to 0-20 can you still get a bunch of species to coexists? What’s the effect of absolute harshness, anyway? Is 0-50 a whole different ball game than 50-1003?
  5. What is the effect of herbivores and disruption? They are very similar as game mechanics (although herbivores are constant and hit one square at a time while disruptions are random and hit multiple squares) but since organisms have to allocate energy to deal with them separately you can have organisms resistant to one but not the other. In theory (Intermediate Disturbance Hypothesis) you should be able to balance out a slow-reproducing, highly competitive species with a fast-reproducing, non-competitive species if herbivores/disruptions kill of individuals of the competitive species at the right frequency. Too much disruption and you lose all the slow-reproducing species and too little and the competitive species squeezes the non-competitive species out of existence.

During all of this you will also see some rather classic ecological growth curves.

Random Rules: Observations and the Scientific Method

Random Rules is the newest in-browser simulator on the site and the only one that doesn’t currently have a help file. This is in part because the in-browser simulators on the site right now are all ones I plan on using in the fall semester and so my first priority is to have them done so I can use them. Making them usefully available for everyone else has to come second. This post is, partly, a help file. That section will be clearly labeled in a subheading. Just skip straight there if that’s all you need – I’ll repeat a few sentences of material in both places so that if you skip straight to the help file you’ll be fine.

Read More